lab6-challenge-report
题目
Lab6 挑战性任务分为必做与选做两个部分。需要完成必做部分的所有功能,以及两项选做任务的其中一项。
在 Lab6 基础部分的实验中我们实现了一个简单的 shell。在本次挑战性任务,我们将通过实现一些难度层次递进的小组件或附加功能,来丰富我们的 shell,从而加深对整个 MOS 的理解,让我们的 MOS 更加完整。
你可以参考 Bash Reference Manual 官方文档来理解并完成以下任务。对于涉及的 Linux 命令和库函数,你可以使用 man 命令,或通过 Linux man pages 查询其手册,为实现提供参考。
必做部分
实现一行多命令
用 ; 分开同一行内的两条命令,表示依次执行前后两条命令。; 左右的命令都可以为空。
提示:在 user/sh.c 中的保留 SYMBOLS 里已经预留有 ; 字符。
实现后台任务
用 & 分开同一行内的两条命令,表示同时执行前后两条命令。& 左侧的命令应被置于后台执行,Shell 只等待 & 右侧的命令执行完毕,然后继续执行后续语句,此时用户可以输入新的命令,并且可能同时观察到后台任务的输出。你需要自行设计测试,以展现此功能的运行效果。& 左侧的命令不能为空。
提示:在 user/sh.c中的保留 SYMBOLS 里已经预留有 & 字符。
实现引号支持
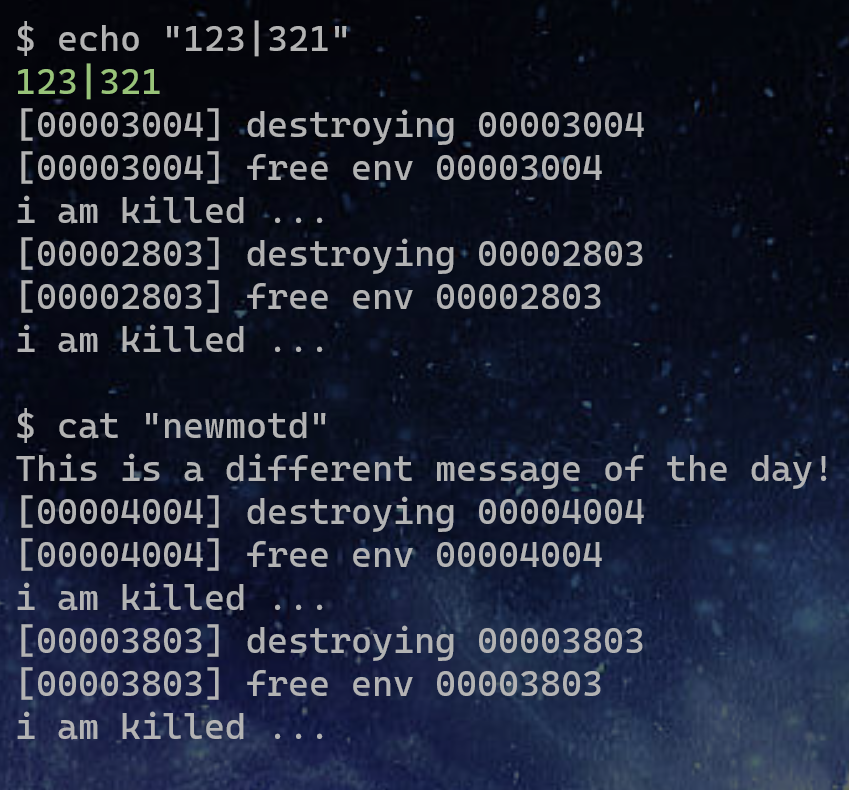
实现引号支持后,shell 可以处理如: echo.b "ls.b | cat.b" 这样的命令。即 shell 在解析时,会将双引号内的内容看作单个字符串,将 ls.b | cat.b 作为一个参数传递给 echo.b。
实现键入命令时任意位置的修改
现有的 shell 不支持在输入命令时移动光标。你需要实现:键入命令时,可以使用 Left 和 Right 移动光标位置,并可以在当前光标位置进行字符的增加与删除。要求每次在不同位置键入后,可以完整回显修改后的命令,并且键入回车后可以正常运行修改后的命令。
实现程序名称中 .b 的省略
目前的用户程序被烧录到文件系统中后,其可执行文件以 .b 为后缀,为 shell 中命令的输入带来了不便。你需要修改现有的实现,以允许命令中的程序名称省略 .b 后缀,例如当用户指定的程序路径不存在时,尝试在路径后追加 .b 再打开。
实现更丰富的命令
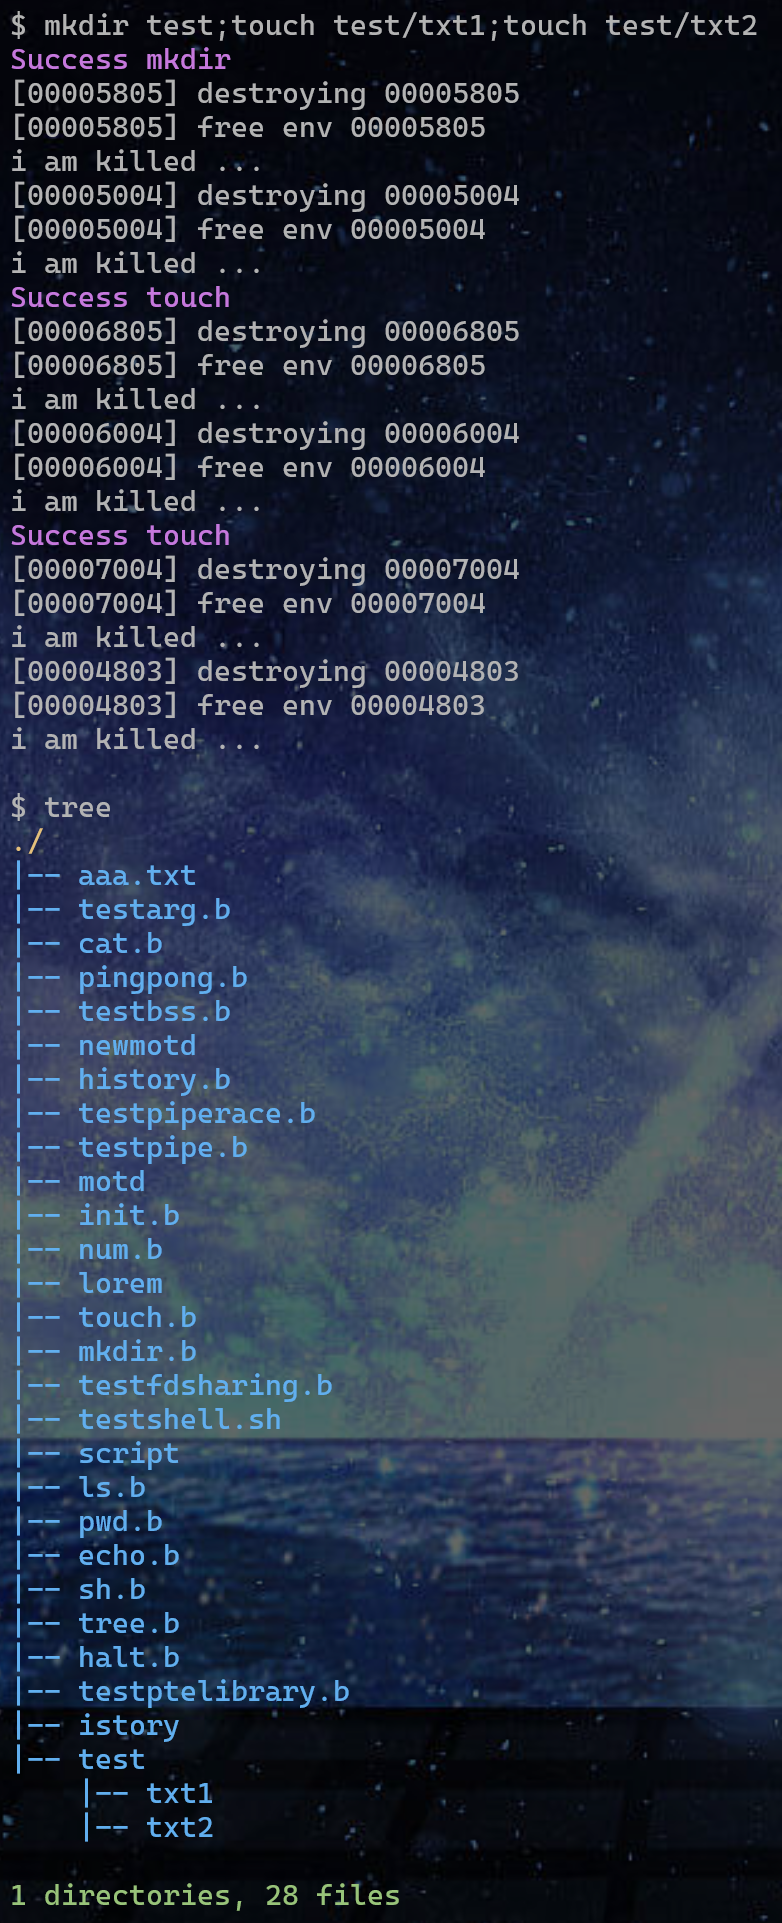
参考实验环境中的 Linux 命令 tree、mkdir、touch 来实现这三个命令,请尽可能地实现其完整的功能。
为了实现文件和目录的创建,你需要实现用户库函数 mkdir() 和文件打开模式 O_CREAT。
实现文件的创建后,你需要修改 shell 中输出重定向 > 的实现,使其能够在目标路径不存在时自动创建并写入该文件。
实现历史命令功能
在 Linux 的 shell 中我们输入的命令都会被保存起来,并可以通过 Up 和 Down 键回溯,这为我们的 shell 操作带来了极大的方便。在此项任务中,需要实现保存所有输入至 shell 的命令,并可以通过 history.b 命令输出所有的历史命令,以及通过上下键回溯命令并运行。
任务提示:
- 要求我们将在 shell 中输入的每步命令,在解析前/后保存进一个专用文件(如
.history )中,每行一条命令。
- 通过编写一个用户态程序
history.b 文件并写入磁盘中,使得每次运行 history.b 时,能够将文件( .history )的内容全部输出。
- 键入 Up 和 Down 时,切换历史命令。键入上下键后,并且按回车,可以执行当前显示的这条命令。
注意
- 禁止使用局部变量或全局变量的形式实现保存历史命令,即不能用进程的堆栈区保存历史命令。
- 禁止在烧录
fs.img 时烧录一个 .history 文件,即你需要在第一次写入时,创建一个.history 文件,并在随后每次输入时在 .history 文件末尾写入。
选做部分 1:实现 shell 环境变量
- 支持
declare [-xr] [NAME [=VALUE]] 命令,其中:
-x 表示变量 NAME 为环境变量,否则为局部变量。
- 环境变量对子 shell 可见,也就是说在 shell 中输入
sh.b 启动一个子 shell 后,可以读取并修改 NAME 的值,即支持环境变量的继承。
- 局部变量对子 shell 不可见,也就是说在 shell 中输入
sh.b 启动一个子 shell 后,没有该局部变量。
-r 表示将变量 NAME 设为只读。只读变量不能被 declare 重新赋值或被 unset 删除。- 如果变量
NAME 不存在,需要创建该环境变量;如果变量 NAME 存在,将该变量赋值为 VALUE。
- 其中
VALUE 为可选参数,缺省时将该变量赋值为空字符串即可。
- 如果没有
[-xr] 及 [NAME [=VALUE]] 部分,即只输入 declare,则输出当前 shell 的所有变量,包括局部变量和环境变量。
- 支持
unset NAME 命令,若变量 NAME 不是只读变量,则删除变量 NAME。
- 支持在命令中展开变量的值,如使用
echo.b $NAME 打印变量 NAME 的值。
选做部分 2:支持相对路径
MOS 中现有的文件系统操作并不支持相对路径,对于一切路径都从根目录开始查找,因此在 shell 命令中也需要用绝对路径指代文件,这为命令的描述带来了不便。你需要为每个进程维护工作目录这一状态,并为 open() 等用户库函数增加对参数中相对路径的支持,将不以 / 开头的路径视为相对路径,从当前进程的工作目录开始查找。同时,你需要添加 chdir() 和 getcwd() 等库函数,以支持切换当前进程的工作目录,并使进程的工作目录在 fork() 或 spawn() 时被子进程继承,从而实现以下功能:
- 支持内部命令
cd <path>,切换工作目录到 <path>,其中 <path> 可以是绝对路径或相对路径;
- 支持
pwd 命令,输出当前工作目录;
- 在切换工作目录后,测试
cat.b、ls.b、touch.b 等接受文件参数的命令,确保其参数中的相对路径能够正常工作。
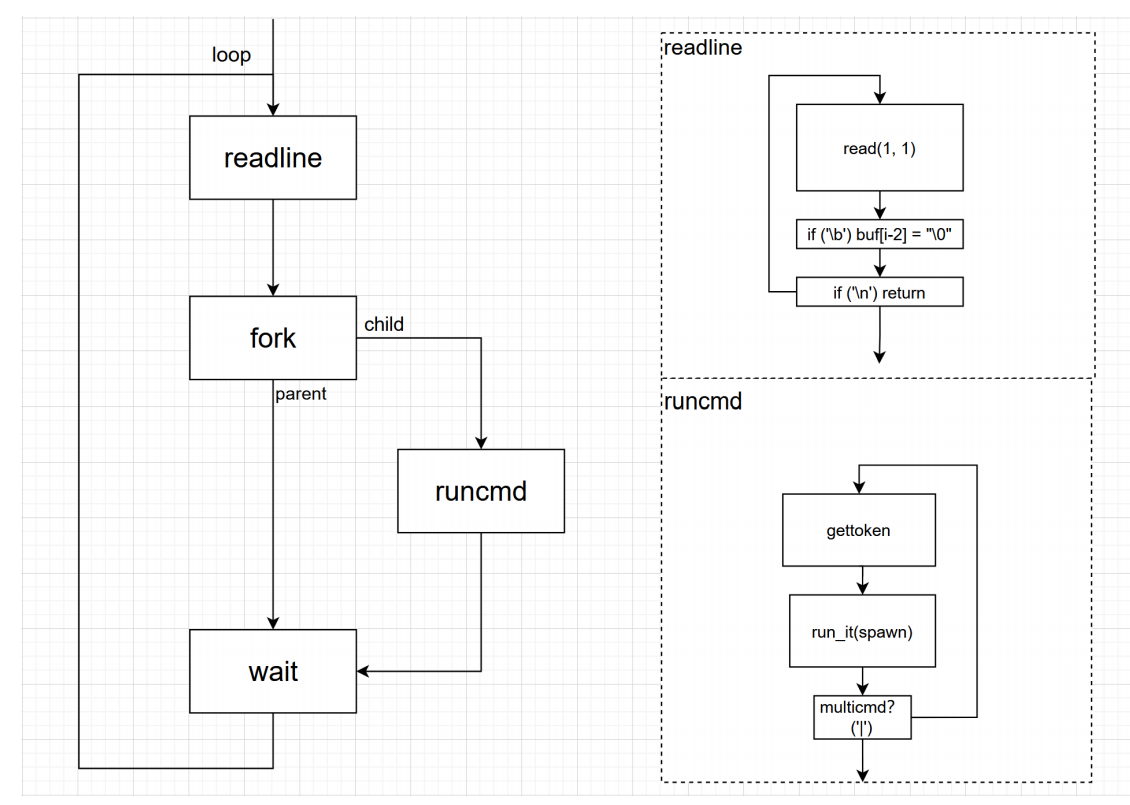
实现思路
如图为lab6架构的简图,也是我们修改的主战场(剩下的用户态操作基本都要自己添加文件实现了)

我在完成了上述必做任务后,选择了实现相对路径的选做任务,除此之外,为了使shell使用更加流畅,我选择了加入clear和彩色输出等来进一步使其更加便于使用,下面为我各部分的实现思路。
添加文件、命令
添加新的命令时,需要修改 /user/include.mk,在 USERAPPS 下添加对应文件的 .b。
想要将自己的 C 语言代码添加到编译过程(用户库)中,需要在 user/include.mk 的 USERLIB 后添加对应文件的 .o。
一行多命令
shell的原理是main 从控制台读取一行后fork,把这一行命令传递给子进程。子进程执行完毕后退出,父进程调用wait函数等待子进程执行结束被摧毁。
因为在 user/sh.c中的保留 SYMBOLS 里已经预留有 ; 字符,gettoken 函数本身就能够解析下一个 ; 字符,所以我们只需要将;作为一个特殊的token即可,我们无需改变词法部分,只需改变语法解释部分。
1
2
3
4
5
6
7
8
9
10
11
|
int forktemp = 0;
case ';':
forktemp = fork();
if (forktemp) {
wait(forktemp);
return parsecmd(argv, rightpipe);
} else {
return argc;
}
break;
|
当 parsecmd 函数解析到 ; 时,对 shell 进程进行 fork ,; 左侧指令作为子进程直接返回执行,右侧指令作为父进程则是先 wait 保证左侧指令执行完毕后,继续向右进行解析。
实现后台任务
前面我们已经提到了shell原理是将一行命令传递到子进程,父进程wait到子进程结束。而后台运行所需要的任务便是shell 不需要等待此命令执行完毕后再继续执行,即当存在&时,不进行wait操作。
所以同理,gettoken 函数本身就能够解析下一个 & 字符。而所谓后台运行所需要的任务便是shell 不需要等待此命令执行完毕后再继续执行,即当存在&时,不进行wait即可。
1
2
3
4
5
6
7
8
9
|
case '&':
if ((r = fork()) == 0) {
return argc;
} else {
return parsecmd(argv, rightpipe);
}
break;
|
当 parsecmd 函数解析到 & 时,对 shell 进程进行 fork ,& 左侧指令作为子进程直接返回执行,右侧指令则是作为父进程继续向右进行解析。
实现引号支持
与一行多命令相仿。查阅user/sh.c,有int _gettoken()函数,作用是从字符串中读取下一个token。所以为了将引号内的内容视为单独的字符串,作为一个参数传递给要执行的命令,我们需要在读到第一个 " 时,将 *p1 指向该 " 的后一位,将 s (字符串指针)不断后移,直到读到与前一个引号相应匹配的 " ,作为需要读入的参数。*s++ = 0 是为了让字符串截止,同时将字符串指针后移一位,使得后续解析能够进行。
1
2
3
4
5
6
7
8
9
10
11
12
13
14
15
16
17
18
|
if (*s == '"') {
*s = 0;
*p1 = ++s;
while (s != 0 && *s != '"') {
s++;
}
if (s == 0) {
debugf("\"don't match!!!\n");
return 0;
}
*s = 0;
*p2 = s;
return 'w';
}
|
实现键入命令时任意位置的修改
实现左右键移动光标和指令任意位置的删改。以在当前光标位置进行字符的增加与删除。在不同位置键入后,可以完整回显修改后的命令,并且键入回车后可以正常运行修改后的命令。
这部分进行的工作比较多。我重写了一遍读取行的部分。因为我认为在原有代码基础上新增功能比较复杂且容易出 bug,还好原本 readline() 的内容就不算多,因此重构得还算顺利。
这里需要维护三个序列:
buf[] 数组:是我们需要的指令行返回值,也是我们得到的真实结果,其中不能有不可见字符;- 显示的输入栏: 显示出来的结果,我们需要维护这个现实的结果是符合要求的;
- 真正的标准输入:真实的标准输入,其中包括用户维持显示结果的大量不可见字符和空格等。
重构后的逻辑是:保存当前光标的位置,每次键入时都会保存光标之后的字符串(若有的话),依次输出光标前的字符串、输入字符、光标后的字符串。在实现过程中要注意维护光标的位置。
具体代码实现如下(这个代码由于后续history使用到了上下键,所以两部分代码耦合在了一起)
1
2
3
4
5
6
7
8
9
10
11
12
13
14
15
16
17
18
19
20
21
22
23
24
25
26
27
28
29
30
31
32
33
34
35
36
37
38
39
40
41
42
43
44
45
46
47
48
49
50
51
52
53
54
55
56
57
58
59
60
61
62
63
64
65
66
67
68
69
70
71
72
73
74
75
76
77
78
79
80
81
82
83
84
85
86
87
88
89
90
91
92
93
94
95
96
97
98
99
100
101
102
103
104
105
106
107
108
109
110
111
112
113
114
115
116
117
118
119
120
121
122
123
124
125
126
127
128
129
130
131
132
133
134
135
136
137
138
139
140
141
142
143
144
145
146
147
148
149
150
151
152
153
154
155
156
157
158
159
160
161
162
163
164
165
166
167
168
169
170
171
172
173
174
175
176
177
178
179
180
|
int offset;
int solveDirCmd(char* buf, int type) {
if (newDirCmd == 1) {
offset = 0;
}
if (type == 0) {
offset--;
} else if (offset < 0) {
offset++;
}
int x = 0;
if (offset == 0) {
while (buf[x] != '\0') {
buf[x] = '\0';
x++;
}
return -1;
}
int fdnum = open(".history", O_RDONLY);
if (fdnum < 0) {
debugf("open .history failed in sloveDir!\n");
return 0;
}
struct Fd* fd = num2fd(fdnum);
char* c;
char* begin = fd2data(fd);
char* end = begin + ((struct Filefd*)fd)->f_file.f_size;
c = end - 1;
while (((*c) == '\n' || (*c) == 0) && (c > begin)) {
c--;
}
if (c == begin) {
buf[0] = '\0';
return 0;
}
c++;
int i;
for (i = 0; i > offset; i--) {
while ((*c) != '\n' && (*c) != '\0') {
c--;
if (c <= begin) {
break;
}
}
c--;
if (c <= begin) {
break;
}
}
offset = i;
if (c > begin) {
while (c > begin && (*c) != '\n') {
c--;
}
if ((*c) == '\n') {
c++;
}
} else {
c = begin;
}
int now = 0;
while (buf[now] != '\0') {
buf[now] = '\0';
now++;
}
now = 0;
while ((*c) != '\n' && (*c) != '\0' && (*c) < end) {
buf[now] = *c;
now++;
c++;
}
return now;
}
#define MOVELEFT(y) printf("\033[%dD", (y))
#define MOVERIGHT(y) printf("\033[%dC", (y))
void readline(char* buf, u_int n) {
int r;
int off = 0;
int len = 0;
char op;
while (off < n) {
if ((r = read(0, &op, 1)) != 1) {
if (r < 0) {
debugf("read error: %d\n", r);
}
exit();
}
if (op == '\b' || op == 0x7f) {
if (off > 0) {
if (off == len) {
buf[--off] = 0;
printf("\033[D \033[D");
} else {
for (int j = off - 1; j < len - 1; j++) {
buf[j] = buf[j + 1];
}
buf[len - 1] = 0;
MOVELEFT(off--);
printf("%s ", buf);
MOVELEFT(len - off);
}
len -= 1;
}
} else if (op == '\r' || op == '\n') {
buf[len] = 0;
return;
}
else if (op == 27) {
char tmp;
read(0, &tmp, 1);
char tmp2;
read(0, &tmp2, 1);
if (tmp == 91 && tmp2 == 65) {
debugf("\x1b[B");
int j;
for (j = 0; j < off; j++) {
debugf("\x1b[D");
}
debugf("\x1b[K");
off = solveDirCmd(buf, 0);
len = strlen(buf);
debugf("%s", buf);
} else if (tmp == 91 && tmp2 == 66) {
int j;
for (j = 0; j < off; j++) {
debugf("\x1b[D");
}
debugf("\x1b[K");
off = solveDirCmd(buf, 1);
len = strlen(buf);
debugf("%s", buf);
}
else if (tmp == 91 && tmp2 == 67) {
if (off < len) {
off++;
} else {
MOVELEFT(1);
}
} else if (tmp == 91 && tmp2 == 68) {
if (off > 0) {
off--;
} else {
MOVERIGHT(1);
}
}
newDirCmd = 0;
} else {
newDirCmd = 1;
if (off == len) {
buf[off++] = op;
} else {
for (int j = len; j > off; j--) {
buf[j] = buf[j - 1];
}
buf[off] = op;
buf[len + 1] = 0;
MOVELEFT(++off);
printf("%s", buf);
MOVELEFT(len - off + 1);
}
len += 1;
}
}
debugf("line too long\n");
while ((r = read(0, buf, 1)) == 1 && buf[0] != '\r' && buf[0] != '\n') {
;
}
buf[0] = 0;
}
|
这里需要着重强调一下Linux对于上下左右键的编码问题
上下左右键在linux中会被编码为
上: 27 ‘[’ ‘A’
下: 27 ‘[’ ‘B’
右: 27 ‘[’ ‘C’
左: 27 ‘[’ ‘D’
(更多编码可以参考博客Terminal Control Escape Sequences)
所以我们需要在读到27[Esc]后连续读取两个字符以判断指令的类型,从而分别调用属于左右键和上下键的不同功能.
实现程序名称中 .b 的省略
spawn函数与 fork 函数类似,其最终效果都是产生一个子进程,不过与 fork 函数不同的是,spawn 函数产生的子进程不再执行与父进程相同的程序,而是装载新的 ELF 文件,执行新的程序。
如果我们再结合之前提到的shell的原理,就会发现spawn就是尝试执行shell里的命令,所以在这里尝试追加执行是最佳位置。所以当用户指定的程序路径不存在时,可以在这里尝试在路径后追加 .b 再打开。
1
2
3
4
5
6
7
8
9
10
11
12
13
14
15
|
if ((fd = open(prog, O_RDONLY)) < 0)
{
char fd_default[128];
strcpy(fd_default, prog);
int fd_len = strlen(fd_default);
fd_default[fd_len] = '.';
fd_default[fd_len + 1] = 'b';
fd_default[fd_len + 2] = 0;
if ((fd = open(fd_default, O_RDONLY)) < 0)
{
return fd;
}
}
|
这里我一开始由于对于lab6的架构不太熟悉,所以采用了特判的方式进行,也可以在一定程度达到预期效果,不过还是会相对比较麻烦的。(具体而言就是对输入字符串进行buf的修改)
1
2
3
4
5
6
7
8
9
10
11
12
13
14
15
16
17
18
19
20
21
22
23
24
25
26
27
28
29
30
31
32
33
34
35
36
37
38
39
40
41
42
43
44
45
46
47
48
49
50
51
52
53
54
55
56
57
58
59
60
61
62
63
64
65
66
67
68
69
70
71
72
73
74
75
| void clarify_cmd(char* cmd) {
int len = strlen(cmd);
for (int i = 0; i < len; i++) {
if ((cmd[i] == 'l' && cmd[i + 1] == 's' &&
(i + 3 >= len || cmd[i + 2] != '.' && cmd[i + 3] != 'b')) ||
(cmd[i] == 'c' && cmd[i + 1] == 'd' &&
(i + 3 >= len || cmd[i + 2] != '.' && cmd[i + 3] != 'b'))) {
len += 2;
for (int j = len - 1; j > i + 1; j--) {
cmd[j] = cmd[j - 2];
}
cmd[i + 2] = '.';
cmd[i + 3] = 'b';
}
}
for (int i = 0; i < len; i++) {
if ((cmd[i] == 'c' && cmd[i + 1] == 'a' && cmd[i + 2] == 't' &&
(i + 4 >= len || cmd[i + 3] != '.' && cmd[i + 4] != 'b')) ||
(cmd[i] == 'p' && cmd[i + 1] == 'w' && cmd[i + 2] == 'd' &&
(i + 4 >= len || cmd[i + 3] != '.' && cmd[i + 4] != 'b'))) {
len += 2;
for (int j = len - 1; j > i + 2; j--) {
cmd[j] = cmd[j - 2];
}
cmd[i + 3] = '.';
cmd[i + 4] = 'b';
}
}
for (int i = 0; i < len; i++) {
if ((cmd[i] == 'e' && cmd[i + 1] == 'c' && cmd[i + 2] == 'h' &&
cmd[i + 3] == 'o' &&
(i + 5 >= len || cmd[i + 4] != '.' && cmd[i + 5] != 'b')) ||
(cmd[i] == 'h' && cmd[i + 1] == 'a' && cmd[i + 2] == 'l' &&
cmd[i + 3] == 't' &&
(i + 5 >= len || cmd[i + 4] != '.' && cmd[i + 5] != 'b')) ||
(cmd[i] == 't' && cmd[i + 1] == 'r' && cmd[i + 2] == 'e' &&
cmd[i + 3] == 'e' &&
(i + 5 >= len || cmd[i + 4] != '.' && cmd[i + 5] != 'b'))) {
len += 2;
for (int j = len - 1; j > i + 3; j--) {
cmd[j] = cmd[j - 2];
}
cmd[i + 4] = '.';
cmd[i + 5] = 'b';
}
}
for (int i = 0; i < len; i++) {
if ((cmd[i] == 'm' && cmd[i + 1] == 'k' && cmd[i + 2] == 'd' &&
cmd[i + 3] == 'i' && cmd[i + 4] == 'r' &&
(i + 6 >= len || cmd[i + 5] != '.' && cmd[i + 6] != 'b')) ||
(cmd[i] == 't' && cmd[i + 1] == 'o' && cmd[i + 2] == 'u' &&
cmd[i + 3] == 'c' && cmd[i + 4] == 'h' &&
(i + 6 >= len || cmd[i + 5] != '.' && cmd[i + 6] != 'b'))) {
len += 2;
for (int j = len - 1; j > i + 4; j--) {
cmd[j] = cmd[j - 2];
}
cmd[i + 5] = '.';
cmd[i + 6] = 'b';
}
}
for (int i = 0; i < len; i++) {
if ((cmd[i] == 'h' && cmd[i + 1] == 'i' && cmd[i + 2] == 's' &&
cmd[i + 3] == 't' && cmd[i + 4] == 'o' && cmd[i + 5] == 'r' &&
cmd[i + 6] == 'y' &&
(i + 8 >= len || cmd[i + 7] != '.' && cmd[i + 8] != 'b'))) {
len += 2;
for (int j = len - 1; j > i + 6; j--) {
cmd[j] = cmd[j - 2];
}
cmd[i + 7] = '.';
cmd[i + 8] = 'b';
}
}
}
|
实现更丰富的命令
tree
tree本身的三种类型的判断可以参考课程组源码中对于ls指令的实现,还是比较简单的,而具体对于程序的遍历,也就只是dfs的过程。
实现了 tree 的三种模式:
-a 是显示所有的文件和目录,模式缺省时默认为 -a;-d 显示所有的目录;-f 为显示文件和目录的完整路径。
同时记录了获取的文件及目录数量,在对参数中每个目录(默认根目录)实行 tree 指令后输出。(根据手册行为,初始的目录是不计入的)
实现方式是递归地判断文件类型:如果读到文件,就输出文件名(无 -d 模式);如果读到目录文件,就继续对目录文件进行处理。
1
2
3
4
5
6
7
8
9
10
11
12
13
14
15
16
17
18
19
20
21
22
23
24
25
26
27
28
29
30
31
32
33
34
35
36
37
38
39
40
41
42
43
44
45
46
47
48
49
50
51
52
53
54
55
56
57
58
59
60
61
62
63
64
65
66
67
68
69
70
71
72
73
74
75
76
77
78
79
80
81
82
83
84
85
86
87
88
89
90
91
92
93
94
95
96
97
98
99
100
101
102
103
104
105
106
107
108
109
110
111
112
113
114
115
116
117
118
119
120
121
122
123
124
125
126
127
|
#include <lib.h>
#define MAXDEPTH 50
int flag[256];
int file_cnt;
int dir_cnt;
void tree(char* path) {
int r;
struct Stat st;
if ((r = stat(path, &st)) < 0) {
user_panic("stat %s: %d", path, r);
}
if (!st.st_isdir) {
printf("%s [error opening dir]\n", path);
printf("0 directories, 0 files\n");
exit();
}
printf("\033[33m%s\n\033[m", path);
treedir(path, 0);
}
void treedir(char* path, int step) {
int fd;
int n;
struct File f;
if ((fd = open(path, O_RDONLY)) < 0) {
return;
}
while ((n = readn(fd, &f, sizeof(f))) == sizeof(f)) {
if (f.f_name[0]) {
tree1(path, f.f_type == FTYPE_DIR, f.f_name, step + 1);
}
}
if (n > 0) {
user_panic("short read in directory %s", path);
}
if (n < 0) {
user_panic("error reading directory %s: %d", path, n);
}
}
void tree1(char* path, u_int isdir, char* name, int step) {
char* sep;
if (flag['d'] && !isdir) {
return;
}
if (step > MAXDEPTH) {
debugf("tree is too deep");
return;
}
for (int i = 0; i < step - 1; i++) {
printf("\033[34m \033[m");
}
printf("\033[34m|-- \033[m");
if (path[0] && path[strlen(path) - 1] != '/') {
sep = "/";
} else {
sep = "";
}
if (flag['f'] && path) {
printf("\033[34m%s%s\033[m", path, sep);
}
printf("\033[34m%s\n\033[m", name);
if (isdir) {
dir_cnt += 1;
char newpath[256];
strcpy(newpath, path);
int namelen = strlen(name);
int pathlen = strlen(path);
if (strlen(sep) != 0) {
newpath[pathlen] = '/';
for (int i = 0; i < namelen; i++) {
newpath[pathlen + i + 1] = name[i];
}
newpath[pathlen + namelen + 1] = 0;
treedir(newpath, step);
} else {
for (int i = 0; i < namelen; i++) {
newpath[pathlen + i] = name[i];
}
newpath[pathlen + namelen] = 0;
treedir(newpath, step);
}
} else {
file_cnt += 1;
}
}
void usage(void) {
printf("\033[31musage: tree [-adf] [directory...]\n\033[m");
exit();
}
int main(int argc, char** argv) {
int i;
ARGBEGIN {
default:
usage();
case 'a':
case 'd':
case 'f':
flag[(u_char)ARGC()]++;
break;
}
ARGEND
int file[MAXDEPTH] = {0};
if (argc == 0) {
tree("./");
} else {
tree(argv[1]);
}
if (flag['d']) {
printf("\033[32m\n%d directories\033[m\n", dir_cnt);
} else {
printf("\033[32m\n%d directories, %d files\033[m\n", dir_cnt, file_cnt);
}
printf("\n");
return 0;
}
|
这里使用了彩色输出使输出的树结构更加的美观简洁。
mkdir 和 touch
这里的mkdir()和touch()用户函数可以模仿咱们最后一次上机时的exam进行编写。
首先在相应头文件中添加需要用到的宏、函数和结构体声明。(这里直接将整个挑战性任务所有的设置全部一次列出了,具体含义可以直接参考函数名)
1
2
3
4
5
6
7
8
9
10
11
12
13
14
15
16
17
18
19
20
21
22
23
24
25
26
27
28
29
30
31
32
33
34
35
36
37
38
39
40
41
42
43
44
45
46
|
#define FSREQ_CREATE_FILE 8
#define FSREQ_CREATE_DIR 9
#define FSREQ_OPENAT 10
struct Fsreq_create_file {
u_char req_path[MAXPATHLEN];
};
struct Fsreq_create_dir {
u_char req_path[MAXPATHLEN];
};
struct Fsreq_openat {
u_int dir_fileid;
char req_path[MAXPATHLEN];
u_int req_omode;
};
int fsipc_create_file(const char*);
int fsipc_create_dir(const char*);
int fsipc_openat(u_int dir_fileid,
const char* path,
u_int omode,
struct Fd* fd);
int create_file(const char* path);
int create_dir(const char* path);
int openat(int dirfd, const char* path, int mode);
#define O_APPEND 0x0004
int syscall_get_cur_path(char* buf);
int syscall_set_cur_path(char* path);
int chdir(char* path);
int getcwd(char* buf);
void pathcat(char* path, const char* suffix);
int walk_path_at(struct File* par_dir,
char* path,
struct File** pdir,
struct File** pfile,
char* lastelem);
int file_openat(struct File* dir, char* path, struct File** pfile);
char* skip_slash(char* p);
|
接下来从用户到文件服务依次实现调用链:
创建用户库函数,调用 fsipc_create_file和fsipc_create_dir。
1
2
3
4
5
6
7
8
9
10
11
12
13
14
15
16
17
18
19
20
21
|
int create_file(const char* path) {
if (path[0] == '/') {
return fsipc_create_file(path);
}
char dpath[128];
try(getcwd(dpath));
pathcat(dpath, path);
return fsipc_create_file(dpath);
}
int create_dir(const char* path) {
if (path[0] == '/') {
return fsipc_create_dir(path);
}
char dpath[128];
try(getcwd(dpath));
pathcat(dpath, path);
return fsipc_create_dir(dpath);
}
|
实现 fsipc_create_file和fsipc_create_dir,将请求需要的参数(文件路径,文件类型)赋值给设定好的 struct Fsreq_create_file和struct Fsreq_create_dir 结构体中,传给 fsipc 函数。
1
2
3
4
5
6
7
8
9
10
11
12
13
14
15
16
17
18
19
20
21
|
int fsipc_create_file(const char* path) {
struct Fsreq_create_file* req;
req = (struct Fsreq_create_file*)fsipcbuf;
if (strlen(path) >= MAXPATHLEN) {
return -E_BAD_PATH;
}
strcpy((char*)req->req_path, path);
return fsipc(FSREQ_CREATE_FILE, req, 0, 0);
}
int fsipc_create_dir(const char* path) {
struct Fsreq_create_dir* req;
req = (struct Fsreq_create_dir*)fsipcbuf;
if (strlen(path) >= MAXPATHLEN) {
return -E_BAD_PATH;
}
strcpy((char*)req->req_path, path);
return fsipc(FSREQ_CREATE_DIR, req, 0, 0);
}
|
实现文件服务端,调用已经实现的 file_create 函数即可。返回0即表示正常,否则返回相应的报错值。
1
2
3
4
5
6
7
8
9
10
11
12
13
14
15
16
17
18
19
20
21
22
23
24
25
|
void serve_create_file(u_int envid, struct Fsreq_create_file* req) {
char* path = req->req_path;
int r;
struct File* file;
if ((r = file_create(path, &file)) < 0) {
ipc_send(envid, r, 0, 0);
} else {
file->f_type = FTYPE_REG;
ipc_send(envid, 0, 0, 0);
}
}
void serve_create_dir(u_int envid, struct Fsreq_create_dir* req) {
char* path = req->req_path;
int r;
struct File* file;
if ((r = file_create(path, &file)) < 0) {
ipc_send(envid, r, 0, 0);
} else {
file->f_type = FTYPE_DIR;
ipc_send(envid, 0, 0, 0);
}
}
|
在 serve 函数中新建 ipc 请求的情况。
1
2
3
4
5
6
7
8
9
10
|
case FSREQ_CREATE_FILE:
serve_create_file(whom, (struct Fsreq_create_file*)REQVA);
break;
case FSREQ_CREATE_DIR:
serve_create_dir(whom, (struct Fsreq_create_dir*)REQVA);
break;
|
实现了文件创建功能后,mkdir 和 touch 只需要相应的调用即可,并传入相应的文件类型。(这里同样使用了彩色输出)
1
2
3
4
5
6
7
8
9
10
11
12
13
14
15
16
17
18
19
20
21
22
23
24
25
26
27
28
29
30
31
32
33
34
35
36
37
|
#include <lib.h>
int main(int argc, char** argv) {
if (argc == 2) {
if (create_dir(argv[1]) < 0) {
printf("create dir failed!\n");
} else {
printf("\033[35mSuccess mkdir\033[m\n");
}
} else {
printf("usage: mkdir [dirname]\n");
}
return 0;
}
#include <lib.h>
int main(int argc, char** argv) {
if (argc == 2) {
if (create_file(argv[1]) < 0) {
printf("create file failed!\n");
} else {
printf("\033[35mSuccess touch\033[m\n");
}
} else {
printf("usage: touch [filename]\n");
}
return 0;
}
|
最后需要修改 shell 中输出重定向 > 的实现,使其能够在目标路径不存在时自动创建并写入该文件。
实现方式是在文件没打开时尝试创建文件,然后打开即可。
1
2
3
4
5
6
7
8
9
10
11
12
13
14
15
16
17
18
|
case '>':
if (gettoken(0, &t) != 'w') {
debugf("syntax error: > not followed by word\n");
exit();
}
if ((r = open(t, O_WRONLY)) < 0) {
if (create(t, FTYPE_REG) < 0) {
debugf("> open and create failed\n");
exit();
}
r = open(t, O_WRONLY);
}
fd = r;
dup(fd, 1);
close(fd);
|
实现历史命令功能
不覆盖写入
由于我们需要不断向history文件中写入新的指令信息,所以文件的打开方式应该为可添加写入,这个的具体实现可以参考去年lab5实验的一个exam——BUAA OS Lab5-2 课上测试
1
2
3
4
5
6
7
8
9
10
11
12
13
14
15
16
17
18
|
#define O_APPEND 0x0004
if ((mode & O_APPEND) != 0) {
fd->fd_offset = size;
}
void save_cmd(char* cmd) {
int r = open(".history", O_CREAT | O_WRONLY | O_APPEND);
if (r < 0) {
debugf("open .history failed! in save");
return r;
}
write(r, cmd, strlen(cmd));
write(r, "\n", 1);
return 0;
}
|
之后直接在main中调用save_cmd即可。
监听上下键
这部分在上文中已经提及了,主要就是对linux编码的判断和处理。
1
2
3
4
5
6
7
8
9
10
11
12
13
14
15
16
17
18
19
20
21
22
23
24
25
26
27
28
29
30
31
32
33
34
35
36
37
38
39
40
41
42
43
44
45
46
47
48
49
50
51
52
53
54
55
56
57
58
59
60
61
62
63
64
65
66
67
68
69
70
71
72
73
74
75
76
77
78
|
int offset;
int solveDirCmd(char* buf, int type) {
if (newDirCmd == 1) {
offset = 0;
}
if (type == 0) {
offset--;
} else if (offset < 0) {
offset++;
}
int x = 0;
if (offset == 0) {
while (buf[x] != '\0') {
buf[x] = '\0';
x++;
}
return -1;
}
int fdnum = open(".history", O_RDONLY);
if (fdnum < 0) {
debugf("open .history failed in sloveDir!\n");
return 0;
}
struct Fd* fd = num2fd(fdnum);
char* c;
char* begin = fd2data(fd);
char* end = begin + ((struct Filefd*)fd)->f_file.f_size;
c = end - 1;
while (((*c) == '\n' || (*c) == 0) && (c > begin)) {
c--;
}
if (c == begin) {
buf[0] = '\0';
return 0;
}
c++;
int i;
for (i = 0; i > offset; i--) {
while ((*c) != '\n' && (*c) != '\0') {
c--;
if (c <= begin) {
break;
}
}
c--;
if (c <= begin) {
break;
}
}
offset = i;
if (c > begin) {
while (c > begin && (*c) != '\n') {
c--;
}
if ((*c) == '\n') {
c++;
}
} else {
c = begin;
}
int now = 0;
while (buf[now] != '\0') {
buf[now] = '\0';
now++;
}
now = 0;
while ((*c) != '\n' && (*c) != '\0' && (*c) < end) {
buf[now] = *c;
now++;
c++;
}
return now;
}
|
替换输入字符
替换输入字符串并不复杂,但难点在于如何使得前一条指令正确的回显。具体细节看上面部分代码即可。
这里用到了linux对于左键和清空键的编码
左: 27 ‘[’ ‘D’
清空: 27 ‘[’ ‘K’
对于.history文件的读取主体逻辑如下,并不复杂,只需要注意特判空文件即可。此外,需要注意,读取字符串后,不应该以\0结尾。这是因为通过上键追溯指令后,用户还可能以对其进行增添。因此此处不能像往常一样,以\0结束字符串。
1
2
3
4
5
6
7
8
9
10
11
12
13
14
15
16
17
18
19
20
21
22
23
24
25
26
27
28
29
30
31
32
|
#include <lib.h>
int main(int argc, char** argv) {
if (argc != 1) {
debugf("usage: history\n");
}
int fdnum = open(".history", O_RDONLY);
if (fdnum < 0) {
debugf("open .history failed\n");
return;
}
char buf;
int r;
int cnt = 0;
int newline = 1;
while ((r = read(fdnum, &buf, 1)) != 0) {
if (newline) {
debugf("\033[32mHistory \033[m");
debugf("\033[34m%d \033[m", cnt);
debugf("\033[32m: \033[m");
debugf("%c", buf);
cnt++;
newline = 0;
} else {
debugf("%c", buf);
}
if (buf == '\n') {
newline = 1;
}
}
}
|
支持相对路径
这部分参考了大佬的博客——「操作系统」challenge实验报告
访问路径的系统调用
相对路径的实现思路是在内核维护一个“当前目录”(绝对路径),并通过系统调用访问和修改。 因此实现了两个系统调用以及添加相应的变量如下。
1
2
3
4
5
6
7
8
9
10
11
12
13
14
15
16
17
18
19
20
21
22
23
24
25
26
27
28
29
30
31
32
33
34
35
36
37
38
39
40
41
42
43
44
45
46
47
48
|
extern char cur_path[128];
char cur_path[128];
SYS_get_cur_path,
SYS_set_cur_path,
#ifndef _CUR_PATH_
#define _CUR_PATH_
#define MAX_PATH_LEN 128
#define E_CUR_PATH 21
int sys_get_cur_path(char *buf) {
strcpy(buf, cur_path);
return 0;
}
int sys_set_cur_path(char *path) {
if (strlen(path) >= MAX_PATH_LEN) {
return -E_CUR_PATH;
}
strcpy(cur_path, path);
return 0;
}
#endif
[SYS_get_cur_path] = sys_get_cur_path,
[SYS_set_cur_path] = sys_set_cur_path,
int syscall_get_cur_path(char *buf);
int syscall_set_cur_path(char *path);
int syscall_get_cur_path(char *buf) {
return msyscall(SYS_get_cur_path, buf);
}
int syscall_set_cur_path(char *path) {
return msyscall(SYS_set_cur_path, path);
}
|
添加库函数
实现 chdir 和 getcwd 封装两个系统调用,实现 pathcat 用于拼接路径。
1
2
3
4
5
6
7
8
9
10
11
12
13
14
15
16
17
18
19
20
21
22
23
24
25
26
27
28
29
30
31
32
33
34
|
#include <lib.h>
int chdir(char *path) {
return syscall_set_cur_path(path);
}
int getcwd(char *buf) {
return syscall_get_cur_path(buf);
}
void pathcat(char *path, const char *suffix) {
int pre_len = strlen(path);
if (suffix[0] == '.') {
suffix += 2;
}
int suf_len = strlen(suffix);
if (pre_len != 1) {
path[pre_len++] = '/';
}
for (int i = 0; i < suf_len; i++) {
path[pre_len + i] = suffix[i];
}
path[pre_len + suf_len] = 0;
}
int chdir(char *path);
int getcwd(char *buf);
void pathcat(char *path, const char *suffix);
|
cd 和 pwd 命令
cd 命令是内部命令,因此不应该创建一个子进程,而是在检测到 cd 命令时直接执行并退出。
在进程创建的时候需要初始化路径。
1
2
3
4
5
6
7
8
9
10
11
12
13
14
15
16
17
18
19
20
21
22
23
24
25
26
27
28
29
30
31
32
33
34
35
36
37
38
39
40
41
42
43
44
45
46
47
48
49
50
51
52
53
54
55
56
57
58
59
60
61
62
63
64
65
66
67
68
69
70
71
72
73
74
75
76
|
void chpwd(int argc, char** argv) {
int r;
if (argc == 1) {
if ((r = chdir("/")) < 0) {
printf("cd failed: %d\n", r);
exit();
}
printf("/\n");
} else {
if (argv[1][0] == '/') {
if ((r = chdir(argv[1])) < 0) {
printf("cd failed: %d\n", r);
exit();
}
} else {
char path[128];
if ((r = getcwd(path)) < 0) {
printf("cd failed: %d\n", r);
exit();
}
if (strcmp(argv[1], "..") == 0) {
int len = strlen(path);
while (path[len - 1] != '/') {
path[len - 1] = '\0';
len--;
}
if (strcmp(path, "/") != 0) {
path[len - 1] = '\0';
}
} else {
pathcat(path, argv[1]);
}
if ((r = open(path, O_RDONLY)) < 0) {
printf("path %s doesn't exist: %d\n", path, r);
exit();
}
close(r);
struct Stat st;
if ((r = stat(path, &st)) < 0) {
user_panic("stat %s: %d", path, r);
}
if (!st.st_isdir) {
printf("path %s is not a directory\n", path);
exit();
}
if ((r = chdir(path)) < 0) {
printf("cd failed: %d\n", r);
exit();
}
}
}
return;
}
void do_incmd(int argc, char** argv) {
if (strcmp(argv[0], "cd") == 0 || strcmp(argv[0], "cd.b") == 0) {
chpwd(argc, argv);
} else {
debugf("\033[2J");
debugf("\033[1;1H");
}
}
if ((r = chdir("/")) < 0) {
printf("created root path failed: %d\n", r);
}
|
pwd 命令直接获取当前路径即可。
1
2
3
4
5
6
7
8
9
10
11
12
13
14
15
16
17
18
19
20
21
22
23
24
25
|
#include <lib.h>
void usage(void) {
printf("usage: pwd\n");
exit();
}
int main(int argc, char **argv) {
int r;
char buf[128];
if (argc != 1) {
usage();
} else {
if ((r = getcwd(buf)) < 0) {
printf("get path failed: %d\n", r);
exit();
}
printf("%s\n", buf);
}
return 0;
}
|
相对路径支持
在上述思路下,支持相对路径最重要的是修改 open 函数的逻辑。
我的思路是除了 / 开头的绝对路径以外,默认打开相对路径,用 getcwd 获取当前绝对路径, 在 open 函数内对相对路径进行拼接。这样做就不需要修改文件系统的内部逻辑了。
相应地,在必做部分实现的 create_file和create_dir 也需要修改。
1
2
3
4
5
6
7
8
9
10
11
12
13
14
15
16
17
18
19
20
21
22
23
24
25
26
27
28
29
30
31
|
if (path[0] == '/') {
try(fsipc_open(path, mode, fd));
} else {
char dpath[128];
try(getcwd(dpath));
pathcat(dpath, path);
try(fsipc_open(dpath, mode, fd));
}
int create_file(const char* path) {
if (path[0] == '/') {
return fsipc_create_file(path);
}
char dpath[128];
try(getcwd(dpath));
pathcat(dpath, path);
return fsipc_create_file(dpath);
}
int create_dir(const char* path) {
if (path[0] == '/') {
return fsipc_create_dir(path);
}
char dpath[128];
try(getcwd(dpath));
pathcat(dpath, path);
return fsipc_create_dir(dpath);
}
|
原有命令和函数的修改
因为默认路径变成了相对路径,因此在很多命令中默认的路径应从 / 改为 ./。
spawn 中默认打开的是根目录下的命令,需要对此做相应的调整。
1
2
3
4
5
6
7
8
9
10
11
12
13
|
tree("./");
ls("./", "");
if (prog[0] != '/') {
fd_default[0] = '/';
strcpy(fd_default + 1, prog);
} else {
strcpy(fd_default, prog);
}
|
彩色输出
1
2
3
4
5
6
7
8
9
10
11
12
| +--------------+--------------------+ +--------------+--------------------+
| Code | Text Color | | Code | Text Color |
+--------------+--------------------+ +--------------+--------------------+
| 30 | Black | | 90 | dark grey |
| 31 | Red | | 91 | light red |
| 32 | Green | | 92 | light green |
| 33 | Yellow | | 93 | yellow |
| 34 | Blue | | 94 | light blue |
| 35 | Magenta | | 95 | light purple |
| 36 | Cyan | | 96 | turquoise |
| 37 | White | | 97 | white |
+--------------+--------------------+ +--------------+--------------------+
|
这里我们只需要按照对应的颜色调用相应的printf即可,例如:
1
| printf("\033[35mSuccess touch\033[m\n");
|
这里就可以直接修改35为其他颜色对应编号以完成彩色输出。
清空操作
增加清空操作可以让你的shell更加便捷和赏心悦目,而且添加非常简单,可以直接作为一个内部命令添加,具体即在之前添加cd指令的地方进行判断是否为clear,再进行简单操作即可。
1
2
3
4
5
6
7
8
9
10
| void do_incmd(int argc, char** argv) {
if (strcmp(argv[0], "cd") == 0 || strcmp(argv[0], "cd.b") == 0) {
chpwd(argc, argv);
} else {
debugf("\033[2J");
debugf("\033[1;1H");
}
}
|
这样我们shell的功能测试告一段落,撒花!!!
实验难点
在本lab代码编写过程中,我出现过几个难以解决的bug,不过好在最终都顺利解决了,现在下方简要汇总:
1.对readline的重构过程中,如果遇到连续的’\b’指令,需要进行特判处理。
2.在编写相对路径的cd指令时,需要对argv[1]是否为..进行特判,如果是则不能通过相对路径链接的方式形成绝对路径。与此同时,绝对路径和相对路径使用在create时的判断也非常容易忽略。
3.shell的许多行为都经过了linux的二次编码,如果不知道这部分知识,很可能会对于实现对应功能无所适从,例如我就是在学长博客中才了解到linux对于上下左右键重新编码这件事的。
4.由于原本的文件系统并没有实现追加功能,因此对 .history 的追加(append)写入需要实现追加的打开方式。
功能测试
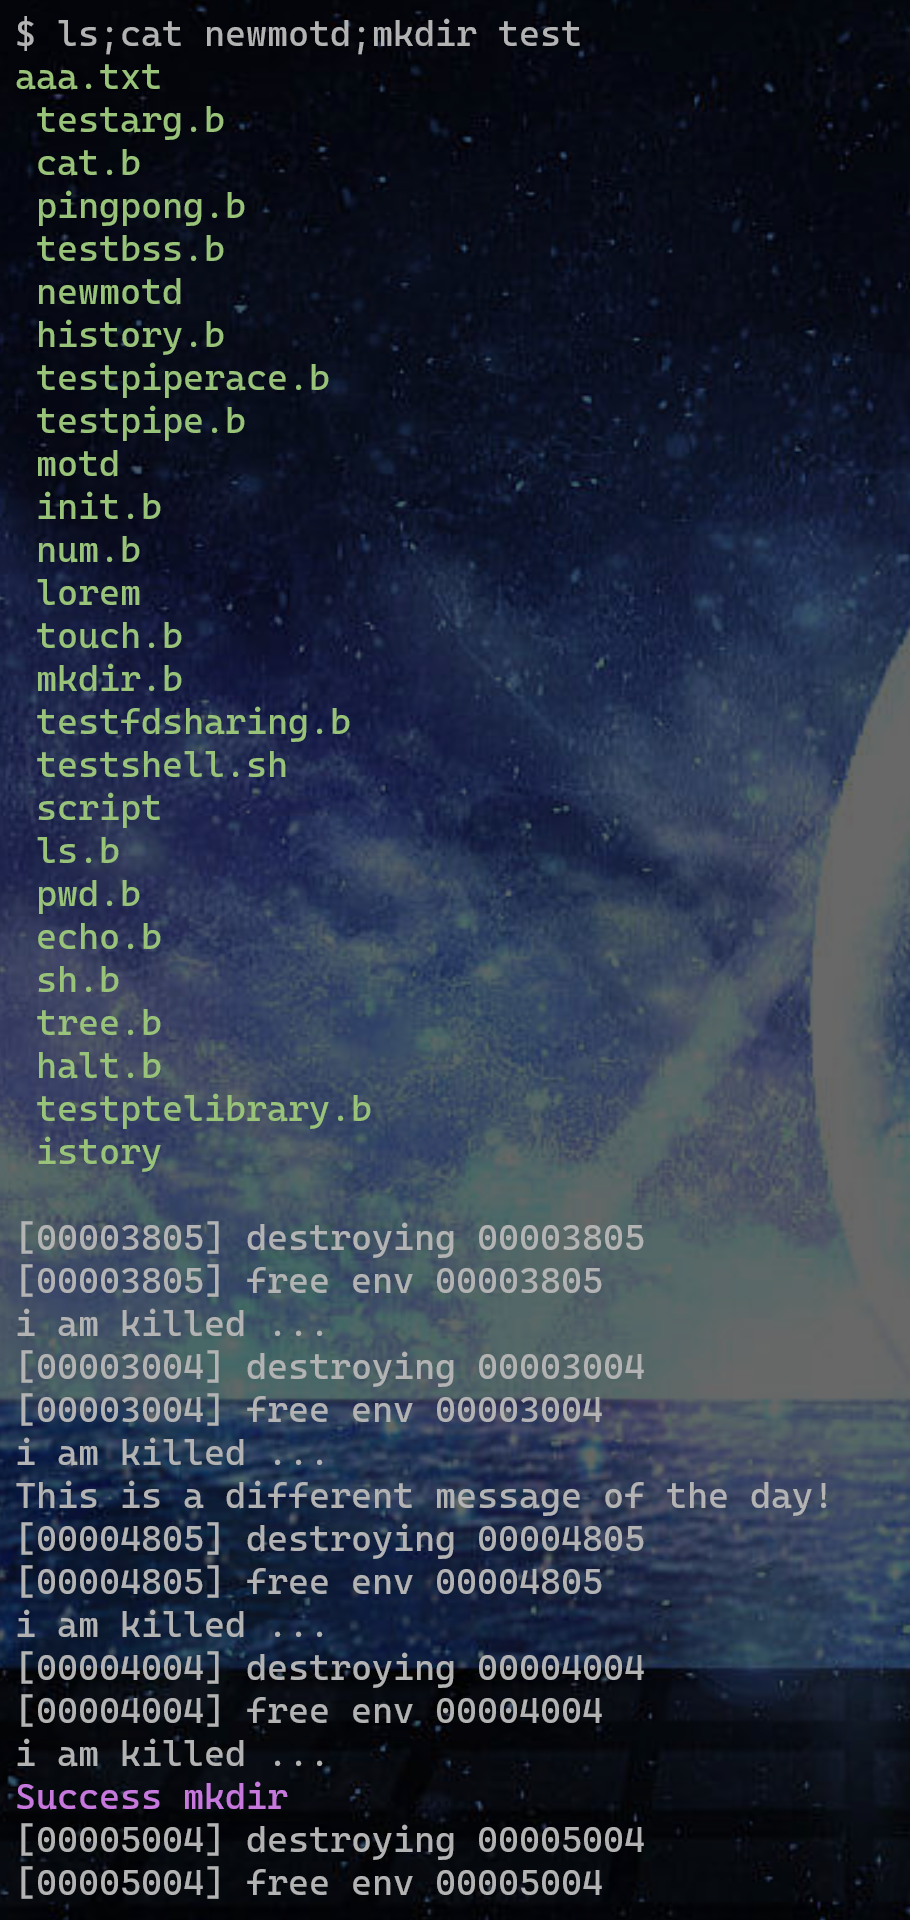
一行多命令
; 分隔符的实验命令和实验现象如下:
从现象中可以看出,; 分隔符实现了一行多命令的功能,在 ; 左侧和右侧没有指令以及一行多个 ; 的情况下都能正常运行。
实现后台任务
& 分隔符的实验命令和实验现象如下:
两条指令都正常进行并退出,其中 ls.b 指令(进程)在后台进行。
实现引号支持
引号支持的实验命令和实验现象如下:
实现键入命令时任意位置的修改
这个在我实际输入时经常打错,其实时刻都在验证这个功能。
实现程序名称中 .b 的省略
前面的实验和实验现象中已经验证了。
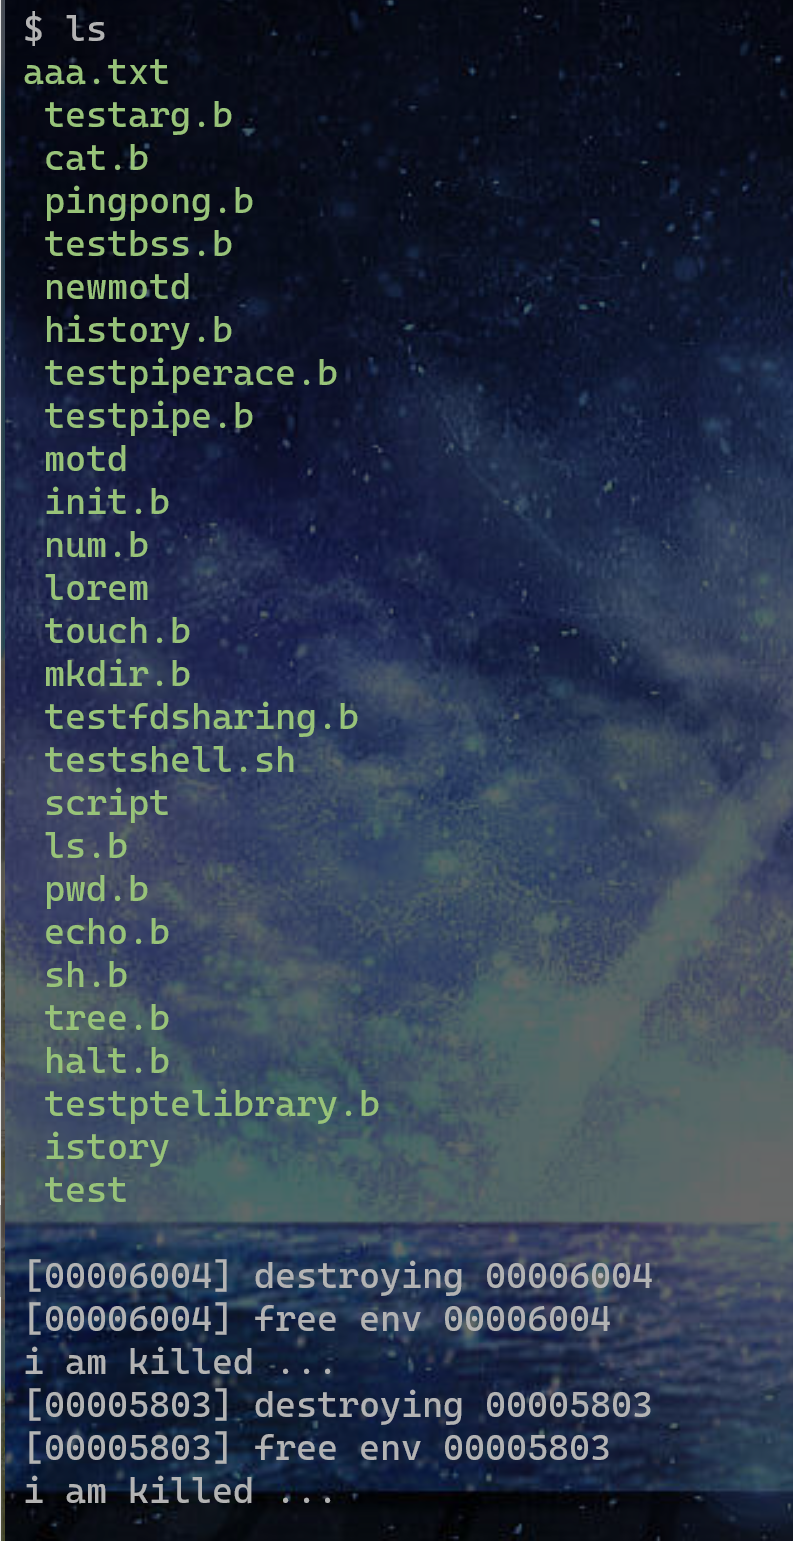
实现更丰富的命令
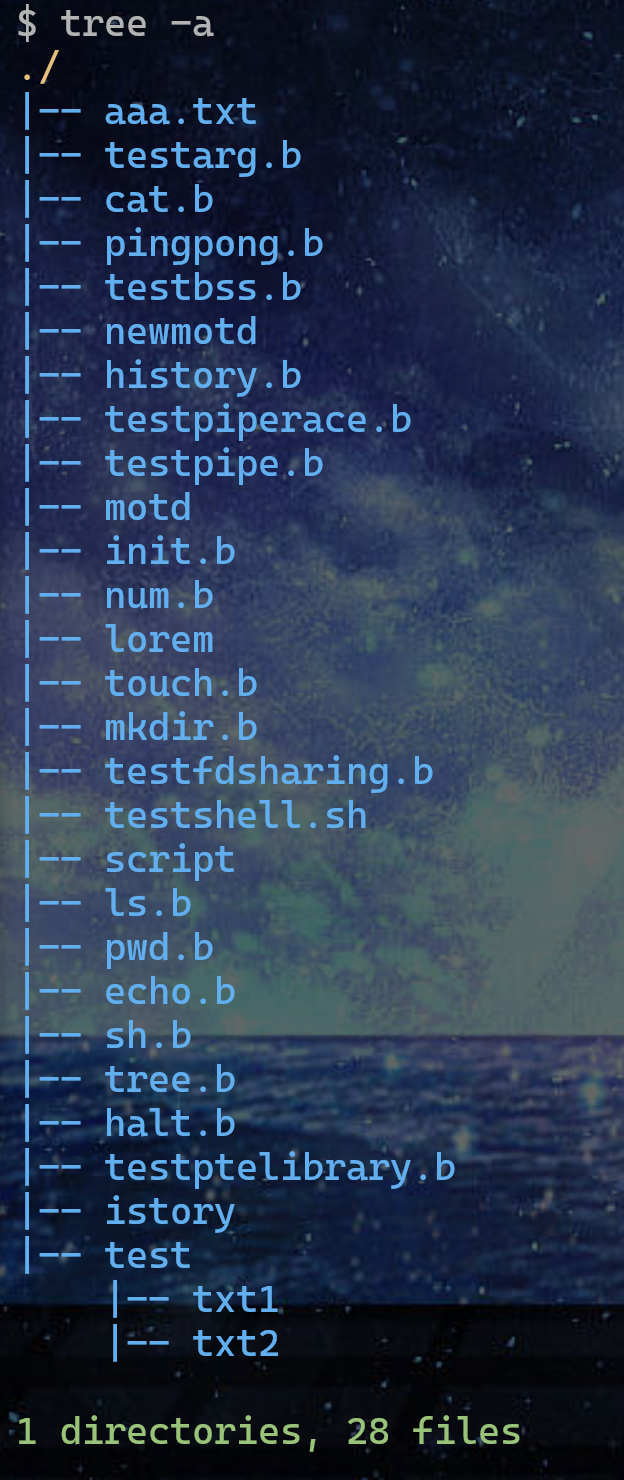
tree 、mkdir 和 touch 指令以及相应的选项验证如下:
创建文件目录和创建文件成功。tree指令用于查看创建效果。
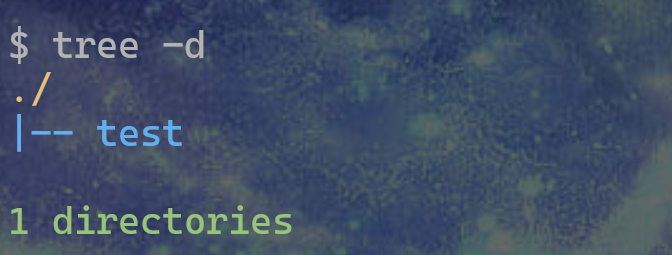
下面验证tree的相关参数:
tree 指令的基本功能正常,-f 选项输出完整路径正常, -d 选项只输出文件目录功能正常,指定路径功能正常。并且能够输出文件目录和文件的计数信息。
修改的重定向功能运行如下:
可以看到,原本没有 newfile 这一文件,重定向会创建这个文件并将内容写入。
实现历史命令功能
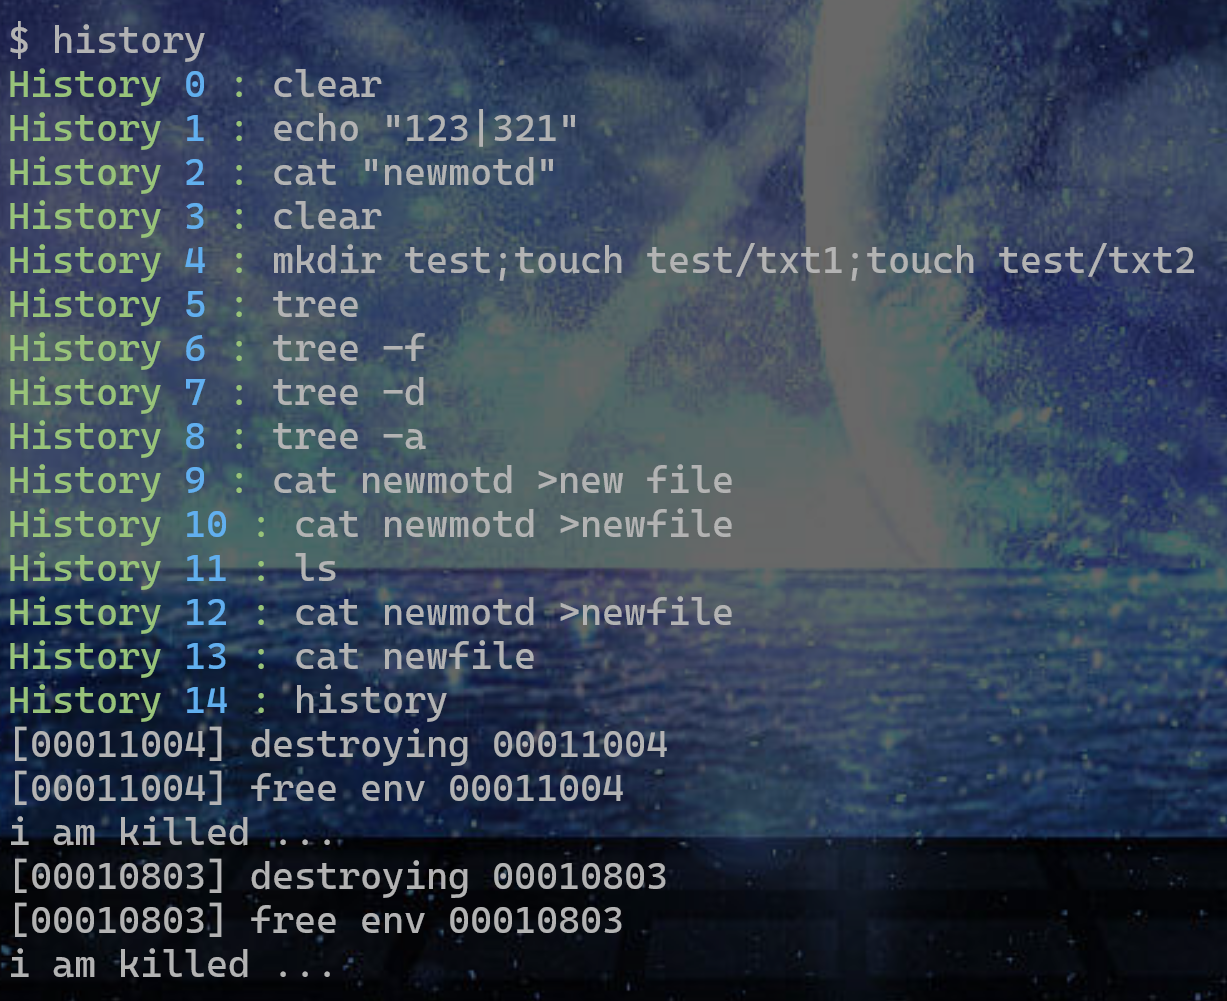
history 指令比较容易形式化验证。
而上下移动在使用过程中已经多次验证了。可以看到,历史记录的查看和运行,以及回到原本输入内容的功能均正确。
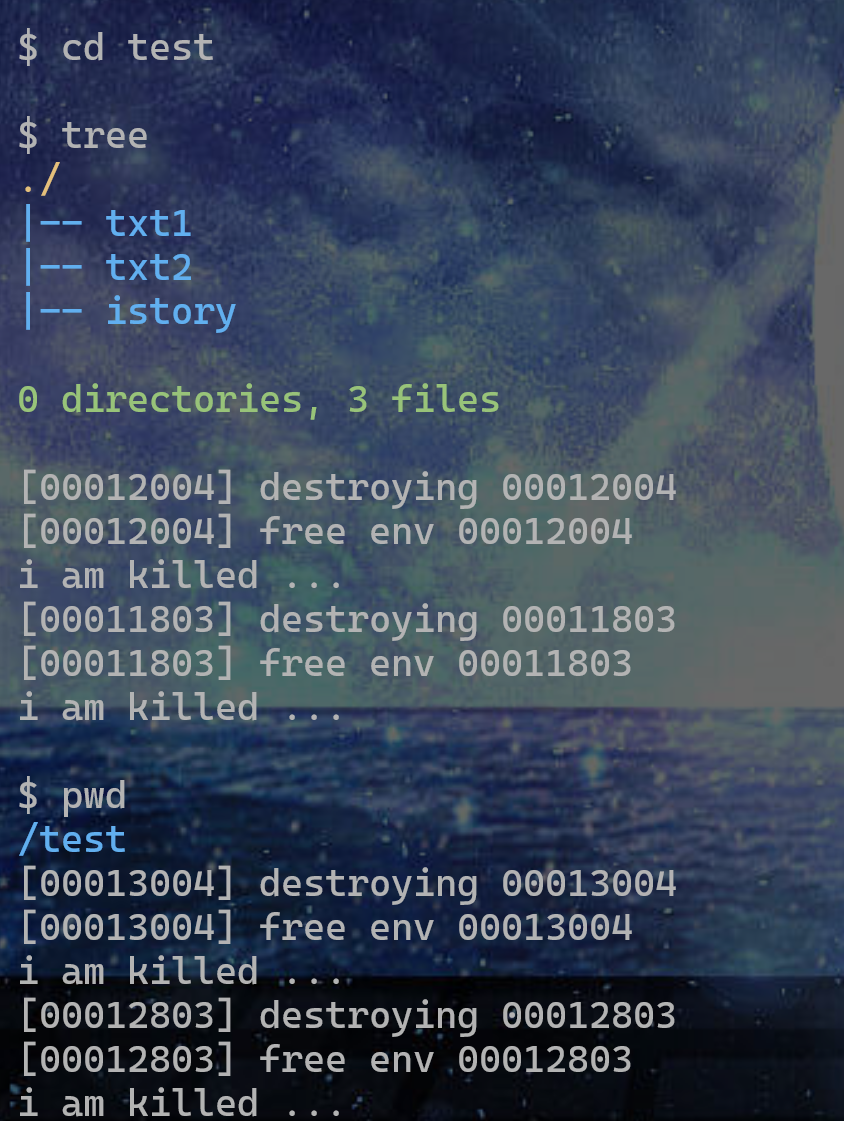
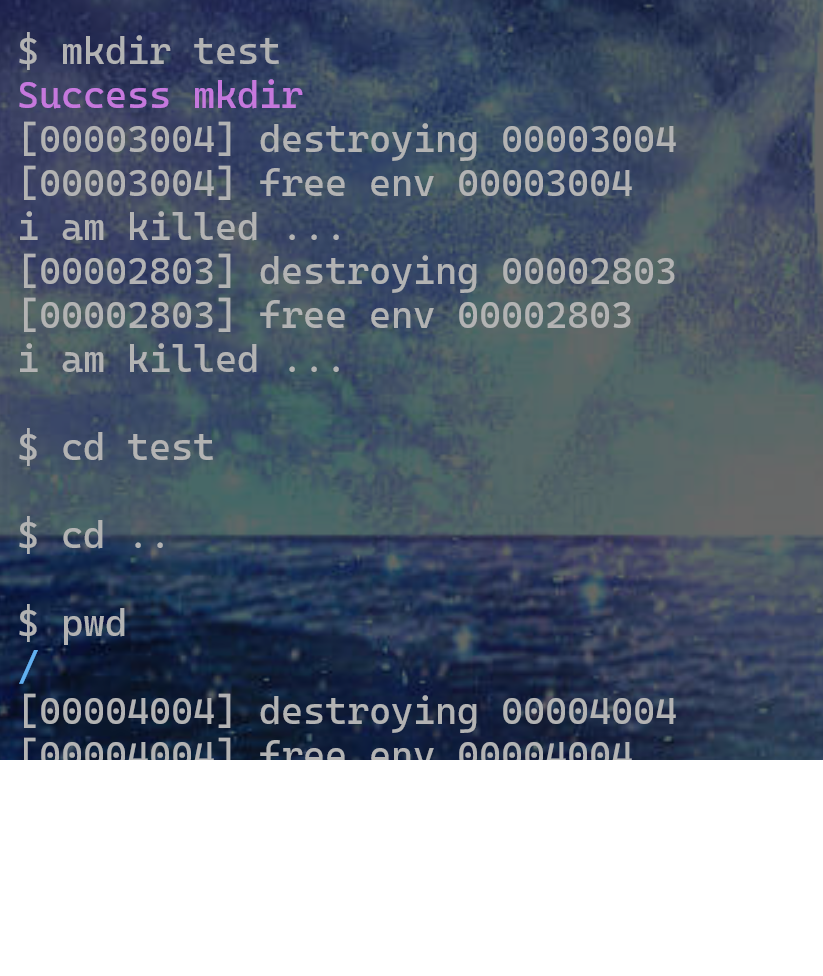
支持相对路径
相对路径的测试如下:
测试cd ..:
后记
最后是对logo的一个花活,OS完结撒花!!!整体来说lab6-challenge的难度还是比较大的,我也参考了一些学长的博客才完成了这次任务,但相比于其他challenge而言,lab6的测试可以直接依托shell实现而不必自己编写程序,可以说lab6-challenge带给我的收获还是非常大的。
以上是我对于lab6-challenge的实现思路和部分源码,可能存在bug,欢迎讨论交流!!!

 从现象中可以看出,
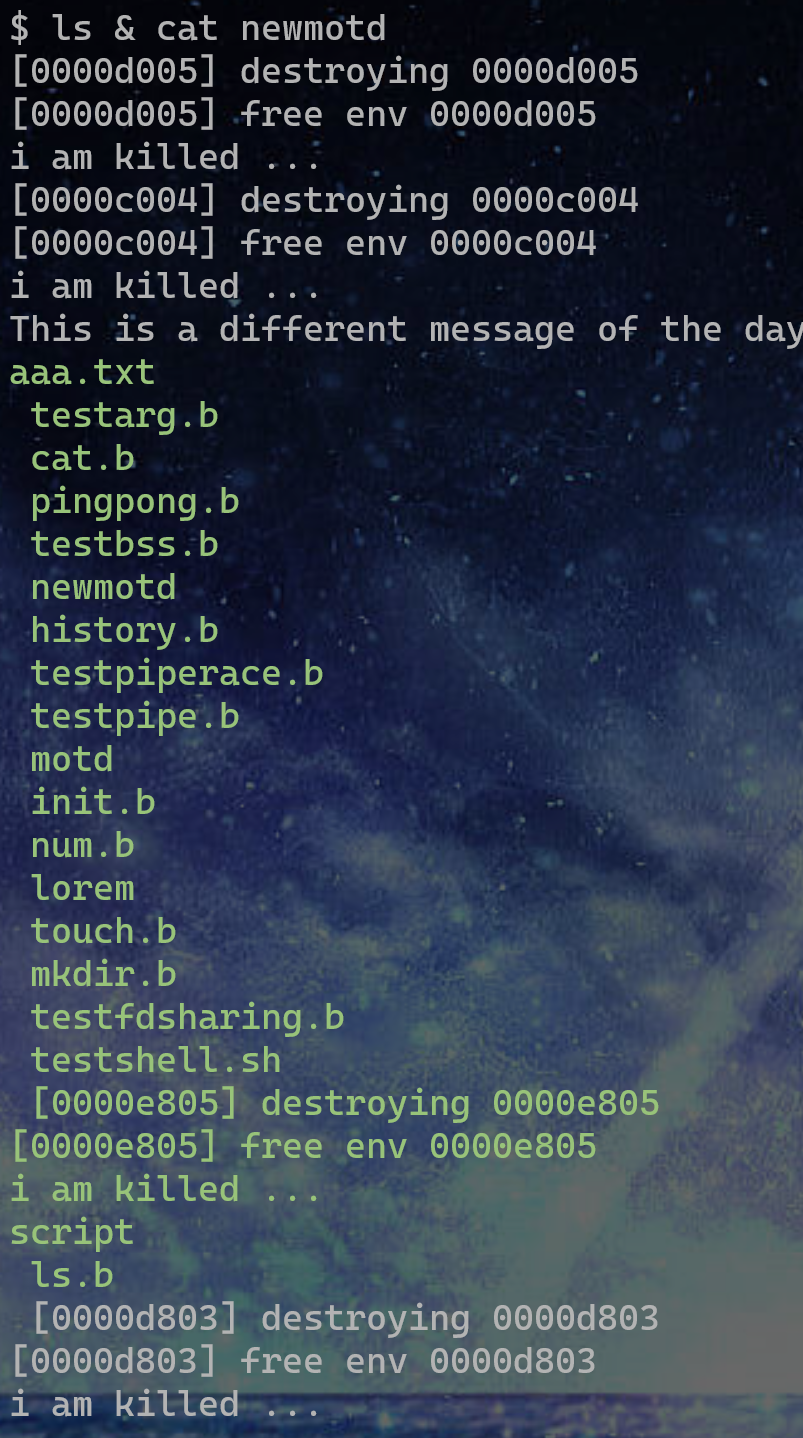
 创建文件目录和创建文件成功。tree指令用于查看创建效果。