姓名:杜金阳
学号:21373191
版本日志:
alpha:
2023.9.29 完成alpha版开发1.0.0,支持基本实践队介绍功能
2023.9.30 完成1.1.0版本,新增底部导航栏设计
2023.10.2 完成1.2.0版本,新增注册用户相关功能
2023.10.5 完成1.3.0版本,新增点赞和收藏功能
2023.10.5 完成1.4.0版本,新增瀑布墙功能并进一步美化UI,至此alpha版本开发结束
beta:
2023.11.20 完成1.5.0版本,实现数据持久化,并实现数据转化json存储,实现中阳地图效果开发。
本项目基于2023年暑假6系官方实践队——“蒲公英”乡野航迹实践队在山西吕梁中阳的相关实践经历,通过设计一款IOS App来实现对本次实践的相关收获进行宣传,于此同时可以宣传中阳的相关文化,带动当地旅游业发展,让更多人走进中阳,了解中阳。
在这里你可以利用地图直观的看到中阳地区的地貌特征,通过实践队的文章了解到中阳地区的产业、文化、历史印记乃至当地百姓的风土人情,可以查看实践队近期的推文并点赞、收藏和评论,可以通过关注并加入我们实践队和我们后续展开其他实践活动,更可以了解我们实践队的背后故事,"蒲公英"乡野航迹实践队期待你的到来。
本项目使用swift+swiftUI进行开发。
本次项目使用了git进行版本管理,并使用GitHub私有仓库进行代码托管,实现了良好的版本控制与保护,在一些时刻使用该技术方便地进行了版本回退等操作。链接——DandelionPracticeTeam
操作系统环境: macOS Ventura 13.6
XCode: Version 15.0
IOS simulator: iPhone 15 Pro
本项目所有测试基于机型iPhone 15 Pro,没有对其他机型进行适配测试,运行于其他机型可能会出现显示问题。
本文档提供的代码存在大量非无关部分内容的删除,如果需要源码请访问上述github链接(在课设结束后改为public仓库)
尽管课程中主要学习了使用UIkit来构建iOS app,但是对于本项目来说,较大的工程量更适合使用swift ui来搭建。在本项目中,大量使用了VStack,HStack,Text,Image,Alert,ScrollView和各种修饰器,并充分运用了Swift语言提供的遍历特性,搭建了结构清晰,内容完整的大型iOS app项目。下面我将从数据结构设计和页面设计两个方面展开具体的介绍。
本项目在alpha版本阶段实现了用户实体,通过注册用户可以实现点赞、收藏、更换头像、描述等功能。
在alpha阶段,因为本项目对于数据库的使用需求并不高,所以设计时使用HashMap进行了相关用户和用户名键值存储。
具体而言,我设计了UserData类来存储当前登录用户的各种信息和DatabaseController类来存储目前已注册用户的用户信息,之后通过enviromentObject将UserData注入即可。
1 2 3 4 5 6 7 8 9 10 11 12 13 14 15 16 17 18 19 20 21 22 23 24 25 26 27 28 29 30 31 32 33 34 35 36 37 38 39 40 41 42 43 44 import SwiftUIimport Combineclass UserData : ObservableObject { @Published var isLogged = false @Published var showAlert = true @Published var username = "未登录" @Published var password = "" @Published var description = "这里是个人描述" @Published var avatar: String = "person.crop.circle" @Published var favorites: [WeChatArt ] = [] @Published var likedArticles: [String ] = [] } import SwiftUIstruct User { var isLogged: Bool var showAlert: Bool var username: String var password: String var description: String var avatar: String var favorites: [WeChatArt ] var likedArticles: [String ] init (isLogged : Bool = false , showAlert : Bool = true , username : String = "未登录" , password : String = "" , description : String = "这里是个人描述" , avatar : String = "person.crop.circle" ,favorites : [WeChatArt ] = [],likedArticles : [String ] = []) { self .isLogged = isLogged self .showAlert = showAlert self .username = username self .password = password self .description = description self .avatar = avatar self .favorites = favorites self .likedArticles = likedArticles } } struct Avatar : Identifiable { let id: Int let systemName: String } var DataTable : [String : User ] = [:]
页面设计方面,本项目通过大量SwiftUI的特性的使用丰富了前端UI的展示和交互。
于此同时,面向对象设计的思想贯穿始终,struct,class,构造器以及类方法等各种面向对象的特性被广泛使用,这保证了本项目的健壮性和鲁棒性,遵循了SOLID设计原则,并广泛采用了单例模式在内的软件设计模式。
1 2 3 4 5 6 7 8 9 10 11 12 13 14 15 16 17 18 19 20 21 22 23 24 25 26 27 28 29 30 31 32 33 34 35 36 37 38 39 40 41 42 43 44 45 46 47 48 49 50 import SwiftUIstruct ContentView : View { @EnvironmentObject var userData: UserData @State private var showImageModal = true var body: some View { TabView { HomeView ().tabItem { Label ("主页" , systemImage: "house" ).background(Color .black.opacity(0.8 )).cornerRadius(8 ) }.background(Color .black.opacity(0.8 )).cornerRadius(8 ) TeamInfoModalView ().tabItem { Label ("实践队简介" , systemImage: "info.circle" ).background(Color .black.opacity(0.8 )).cornerRadius(8 ) } Button (action: { showImageModal.toggle() }) { VStack { Image ("LvLiangTeam" ).padding() Label ("点击这里,关注我们" , systemImage: "star" ) .foregroundColor(.orange) .bold() .font(.system(.largeTitle)) .fontWeight(.medium) .italic() .shadow(color: .black, radius: 1 , x: 0 , y: 2 ) } } .sheet(isPresented: $showImageModal ) { ImageViewer () } .tabItem { Label ("关注我们" , systemImage: "star" ) .background(Color .black.opacity(0.8 )) .cornerRadius(8 ) }.background(Image ("Pic2" ).resizable().scaledToFill()).cornerRadius(8 ) ProfileModalView ().tabItem { Label ("我的" , systemImage: "person.circle" ).background(Color .black.opacity(0.8 )).cornerRadius(8 ) } }.background(Color .black) } } #Preview { ContentView ().environmentObject(UserData ()) }
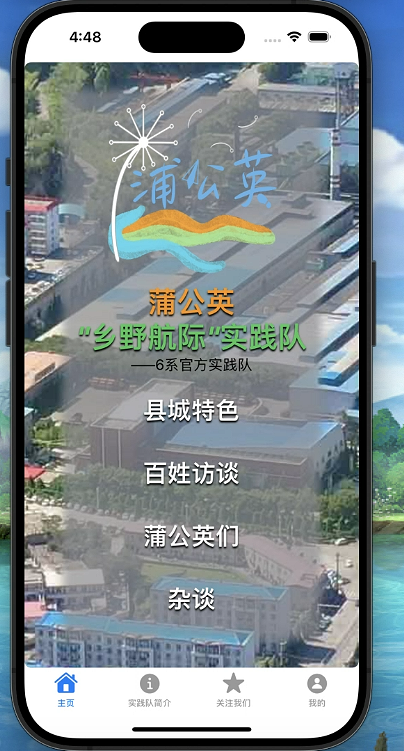
首页主要设计了四个主要功能
县城特色:用于介绍山西吕梁中阳来自中阳县、产业、文化和历史印记四个方面的特色文化
百姓访谈:用于介绍中阳实践期间在县城各个阶层访谈的收获,和对各个阶层人民收入、生活、家庭等方方面面的介绍
蒲公英们:介绍了我们实践队的主要的实践队成员。
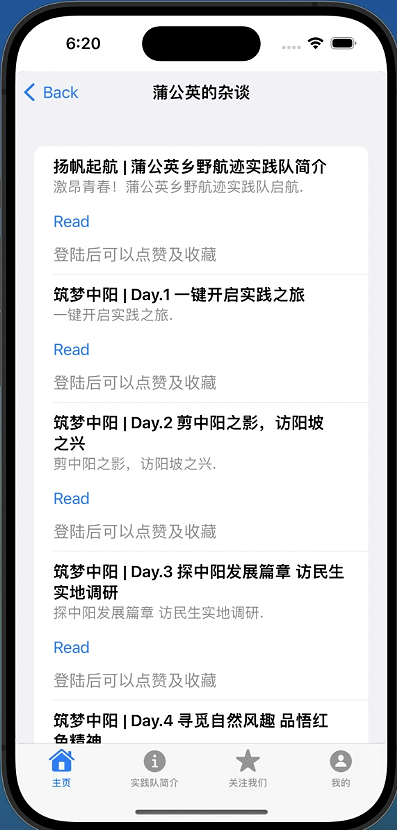
杂谈:以日记的形式记录了实践队在中阳的生活及实践内容,与微信公众号同步。
1 2 3 4 5 6 7 8 9 10 11 12 13 14 15 16 17 18 19 20 21 22 23 24 25 26 27 28 29 30 31 32 33 34 35 36 37 38 39 40 41 42 43 44 45 46 47 48 49 50 51 52 53 54 55 56 57 58 59 60 61 62 63 64 65 66 67 68 69 70 71 72 73 74 import SwiftUIstruct HomeView : View { @EnvironmentObject var userData: UserData var body: some View { NavigationView { ZStack { Image ("ZhongYangFromSky" ).padding() VStack { VStack { Image ("TeamLogo" ).resizable() .frame(width: 200 , height: 200 ,alignment: .center) Text ("蒲公英" ) .foregroundColor(.orange) .bold() .font(.system(.largeTitle)) .fontWeight(.medium) .italic() .shadow(color: .black, radius: 1 , x: 0 , y: 2 ) Text ("\" 乡野航际\" 实践队" ) .foregroundColor(.green) .bold() .font(.system(.largeTitle)) .fontWeight(.medium) .italic() .shadow(color: .black, radius: 1 , x: 0 , y: 2 ) Text ("——6系官方实践队" ) NavigationLink (destination: CountyFeaturesView ()) { Text ("县城特色" ) .foregroundColor(.white) .bold() .font(.system(.title)) .fontWeight(.medium) .italic() .shadow(color: .black, radius: 1 , x: 0 , y: 2 ) }.padding() NavigationLink (destination: PublicInterviews ()) { Text ("百姓访谈" ) .foregroundColor(.white) .bold() .font(.system(.title)) .fontWeight(.medium) .italic() .shadow(color: .black, radius: 1 , x: 0 , y: 2 ) }.padding() NavigationLink (destination: Dandelions ()) { Text ("蒲公英们" ) .foregroundColor(.white) .bold() .font(.system(.title)) .fontWeight(.medium) .italic() .shadow(color: .black, radius: 1 , x: 0 , y: 2 ) }.padding() NavigationLink (destination: TitleTattle ()) { Text ("杂谈" ) .foregroundColor(.white) .bold() .font(.system(.title)) .fontWeight(.medium) .italic() .shadow(color: .black, radius: 1 , x: 0 , y: 2 ) }.padding() }.padding() .background( Color .gray.opacity(0.7 ).blur(radius: 5 ) ) } } } } }
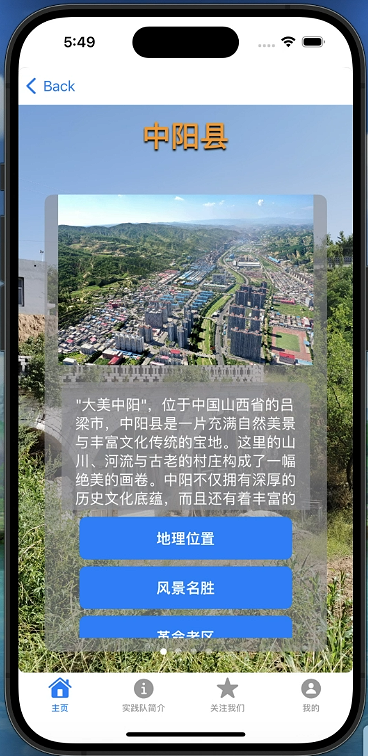
县城特色板块分为中阳县,产业,文化,历史印记四个板块。每个板块有几个和该板块相关的主题的按钮,我们可以通过点击不同的按钮了解与该主题有关的内容和图片,而板块之间可以通过左右滑动进行切换。
1 2 3 4 5 6 7 8 9 10 11 12 13 14 15 16 17 18 19 20 21 22 23 24 25 26 27 28 29 30 31 32 33 34 35 36 37 38 39 40 41 42 43 44 45 46 47 48 49 50 51 52 53 54 55 56 57 58 59 60 61 62 63 64 65 66 67 68 69 70 71 72 73 74 75 76 77 78 79 80 81 82 83 84 85 86 87 88 89 90 91 92 93 94 95 struct CountyFeaturesView :View { var body:some View { TabView { ForEach (pagesData) { page in PageViewContentView (page: page) } } .tabViewStyle(PageTabViewStyle (indexDisplayMode: .always)) } } struct PageViewContentView :View { var page:PageData var body:some View { ZStack { Image (page.imageName) .resizable() .scaledToFill() .edgesIgnoringSafeArea(.all) VStack { Text (page.description) .font(.largeTitle) .foregroundColor(.orange) .bold() .padding() .italic() .shadow(color: .black, radius: 1 , x: 0 , y: 2 ) ForEach (page.sectionData) { section in SectionDataView (section: section) }.tabViewStyle(PageTabViewStyle (indexDisplayMode: .always)) } } } } struct SectionDataView : View { var section: SectionData var body: some View { VStack (spacing: 20 ) { Image (self .selectedImage) .resizable() .frame(maxWidth: 300 ,maxHeight: 200 ) ScrollView { VStack { ScrollView { Text (self .descriptionText) .font(.body) .foregroundColor(.white) .multilineTextAlignment(.leading) .padding() .background( RoundedRectangle (cornerRadius: 10 ) .foregroundColor(Color .gray.opacity(0.7 )) ) } .frame(maxHeight: 150 ) ForEach (section.buttonSet, id: \.title) { button in Button (button.title) { selectedImage = button.imageBinding descriptionText = button.descriptionBinding } .padding() .frame(width: 250 , height: 50 ) .bold() .background(Color .blue) .foregroundColor(.white) .cornerRadius(8 ) } } }.frame(maxHeight: 300 ) }.frame(maxWidth: 300 ) .padding([.horizontal, .bottom]) .background(Color .gray.opacity(0.6 )) .cornerRadius(10 ) .frame(maxWidth: .infinity, maxHeight: .infinity, alignment: .center) } } struct ButtonData { var title: String var imageBinding: String var descriptionBinding: String var section:SectionData ? var action: ((Binding <String >,Binding <String >) -> Void )? init (title : String , imageBinding : String , descriptionBinding : String ) { self .title = title self .imageBinding = imageBinding self .descriptionBinding = descriptionBinding } }
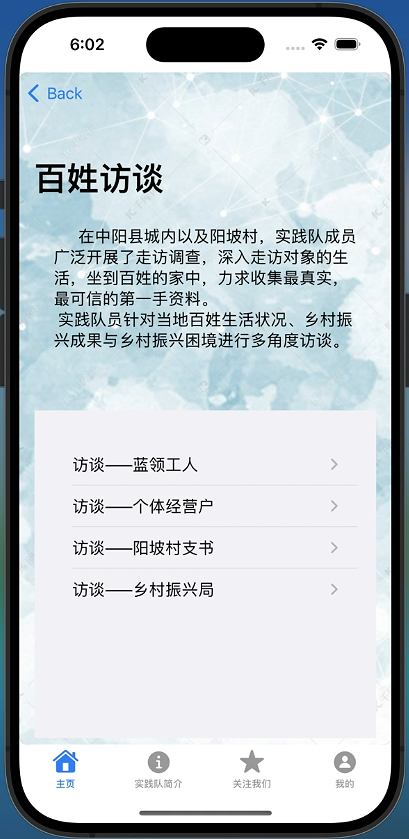
本版块针对当地百姓的生活情况、乡村振兴成果和乡村振兴困境三个方面展开,通过实践队员实地走访,了解各个阶层百姓的生活情况,于是形成了这个板块。
1 2 3 4 5 6 7 8 9 10 11 12 13 14 15 16 17 18 19 20 21 22 23 24 25 26 27 28 29 30 31 32 33 34 35 36 37 38 39 40 41 42 43 44 45 46 47 48 49 50 51 52 53 54 struct PublicInterviews :View { var body:some View { NavigationView { ZStack { Image ("Pic1" ) .resizable() .scaledToFill() .edgesIgnoringSafeArea(.all) VStack (spacing: 20 ){ Spacer () List (articles) { article in NavigationLink (destination: ArticleDetailView (article: article)) { Text (article.title) }.listRowBackground(Color .clear) } .navigationTitle("百姓访谈" ) .background(Color .clear) }.padding() } } } } struct Article : Identifiable { var id: Int var title: String var content: String } struct ArticleDetailView : View { var article: Article var body: some View { ZStack { Image ("Pic2" ) .resizable() .scaledToFill() .edgesIgnoringSafeArea(.all) VStack (spacing: 20 ) { Text (article.title) .font(.title) .bold() .padding() ScrollView { Text (article.content) .font(.body) .padding() } } } } }
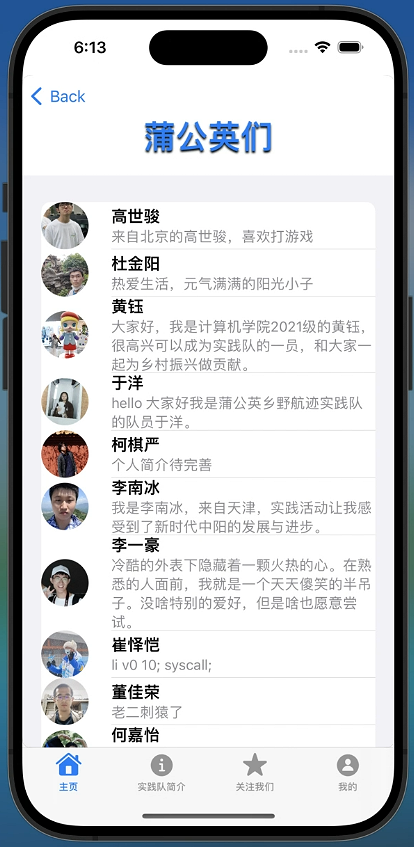
该板块介绍了我们实践队的主要成员,每个队员的介绍分为照片、姓名和人物简介三个部分,有下拉列表可以通过上下拉动进行全局的调控。
1 2 3 4 5 6 7 8 9 10 11 12 13 14 15 16 17 18 19 20 21 22 23 24 25 26 27 28 29 30 31 32 33 34 35 36 37 38 39 40 41 42 43 44 45 46 47 48 49 50 51 52 53 54 55 56 57 58 59 60 61 62 63 64 struct Dandelions :View { var body:some View { VStack { Text ("蒲公英们" ).font(.system(.largeTitle)) .foregroundColor(.blue) .bold() .font(.system(.largeTitle)) .fontWeight(.medium) .italic() .shadow(color: .black, radius: 1 , x: 0 , y: 2 ) MemberListView () } } } struct MemberListView : View { var body: some View { NavigationView { List { Section (header: AvatarView (imageName: "header_avatar" , size: 200 ) .padding(.top, - 200 )) { ForEach (members, id: \.name) { member in HStack { AvatarView (imageName: member.avatar, size: 50 ) VStack (alignment: .leading) { Text (member.name) .font(.headline) Text (member.introduction) .font(.subheadline) .foregroundColor(.gray) } .padding(.leading) } .listRowInsets(EdgeInsets ()) } } } .listStyle(InsetGroupedListStyle ()) } } } struct Member { let name: String let avatar: String let introduction: String } struct AvatarView : View { let imageName: String var size: CGFloat = 100 var body: some View { Image (imageName) .resizable() .scaledToFill() .frame(width: size, height: size) .clipShape(Circle ()) } }
这一个板块是对我们实践队中阳之旅的介绍,介绍了我们在实践过程中的收获,在这里发布了我们实践队实践过程的所见所思所感的文章,App用户支持在登录后点赞和收藏,同时通过点击Read按钮可以跳转到相应微信公众号文章,之后可以在公众号完成评论功能。用户可以通过点击点赞(大拇指)按钮为这篇推文点赞,也可以再点击一次取消点赞。用户可以通过点击收藏(黄色五角星)按钮收藏这篇推文,也可以再点击一次取消收藏。
1 2 3 4 5 6 7 8 9 10 11 12 13 14 15 16 17 18 19 20 21 22 23 24 25 26 27 28 29 30 31 32 33 34 35 36 37 38 39 40 41 42 43 44 45 46 47 48 49 50 51 52 53 54 55 56 57 58 59 60 61 62 63 64 65 66 67 68 69 70 71 72 73 74 75 76 77 78 79 80 81 82 83 84 85 86 87 88 89 90 91 92 93 94 95 struct TitleTattle :View { @EnvironmentObject var userData: UserData var body: some View { NavigationView { List (articles, id: \.title) { article in VStack (alignment: .leading) { Text (article.title) .font(.headline) Text (article.summary) .font(.subheadline) .foregroundColor(.gray) Button ("Read" ) { openURL(article.url) } .padding(.top, 8 ) if userData.isLogged { HStack { Image (systemName: userData.favorites.contains(article) ? "heart.fill" : "heart" ) .foregroundColor(userData.favorites.contains(article) ? .red : .gray) .onTapGesture { article.isFavorite.toggle() favoriteChanged(article) } Image (systemName: userData.likedArticles.contains(article.title) ? "hand.thumbsup.fill" : "hand.thumbsup" ) .foregroundColor(userData.likedArticles.contains(article.title) ? .green : .gray) .onTapGesture { likeArticle(article) } Text ("\(article.likes) likes" ) } .padding(.top, 4 ) } else { Text ("登陆后可以点赞及收藏" ) .foregroundColor(.gray) .padding(.top, 4 ) } } } }.navigationTitle("蒲公英的杂谈" ) } private func openURL (_ url : URL ) { UIApplication .shared.open(url) } private func favoriteChanged (_ article : WeChatArt ) { if let index = userData.favorites.firstIndex(of: article) { userData.favorites.remove(at: index) } else { userData.favorites.append(article) } } private func likeArticle (_ article : WeChatArt ) { if ! userData.likedArticles.contains(article.title) { article.likes += 1 userData.likedArticles.append(article.title) } else { article.likes -= 1 if let index = userData.likedArticles.firstIndex(of: article.title) { userData.likedArticles.remove(at: index) } } } } class WeChatArt : ObservableObject ,Equatable ,Hashable { let title: String let summary: String let url: URL @Published var likes: Int @Published var isFavorite: Bool init (title : String , summary : String , url : URL , likes : Int , isFavorite : Bool ) { self .title = title self .summary = summary self .url = url self .likes = likes self .isFavorite = isFavorite } static func == (lhs : WeChatArt , rhs : WeChatArt ) -> Bool { return lhs.title == rhs.title && lhs.summary == rhs.summary && lhs.url == rhs.url && lhs.likes == rhs.likes && lhs.isFavorite == rhs.isFavorite } func hash (into hasher : inout Hasher ) { hasher.combine(title) hasher.combine(summary) hasher.combine(url) } }
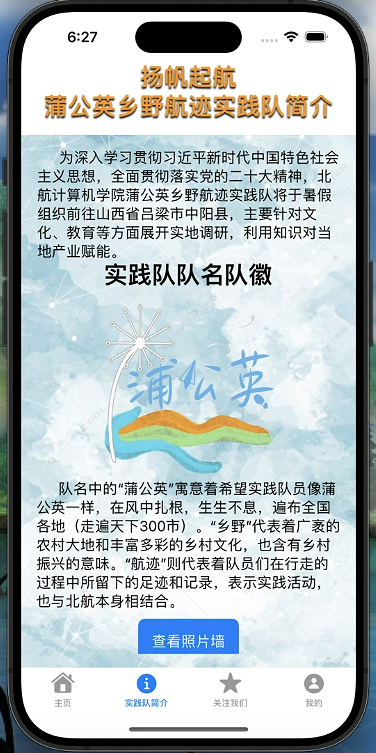
这个部分是对我们实践队的简单介绍,包括了队徽含义,实践简述,还有照片墙的设计。
1 2 3 4 5 6 7 8 9 10 11 12 13 14 15 16 17 18 19 20 21 22 23 24 25 26 27 28 29 30 31 32 33 34 35 36 37 38 39 40 41 42 43 44 45 46 47 48 49 struct TeamInfoModalView : View { @EnvironmentObject var userData: UserData var body: some View { NavigationView { VStack { HStack { Spacer () Text ("扬帆起航" ) .foregroundColor(.orange) .bold() .font(.system(.title)) .fontWeight(.medium) .italic() .shadow(color: .black, radius: 1 , x: 0 , y: 2 ) Spacer () } Text ("蒲公英乡野航迹实践队简介" ) .foregroundColor(.orange) .bold() .font(.system(.title)) .fontWeight(.medium) .italic() .shadow(color: .black, radius: 1 , x: 0 , y: 2 ) ScrollView { Text ("实践队队名队徽" ) .foregroundColor(.black) .font(.system(.title)) .bold() Image ("TeamLogo" ).resizable() .frame(width: 200 , height: 200 ,alignment: .center) NavigationLink (destination: PhotoWallView ()){ Text ("查看照片墙" ) .padding() .background(Color .blue) .foregroundColor(.white) .cornerRadius(8 ) } }.padding() .background( Image ("Pic1" ).resizable() .scaledToFill() ) } } } }
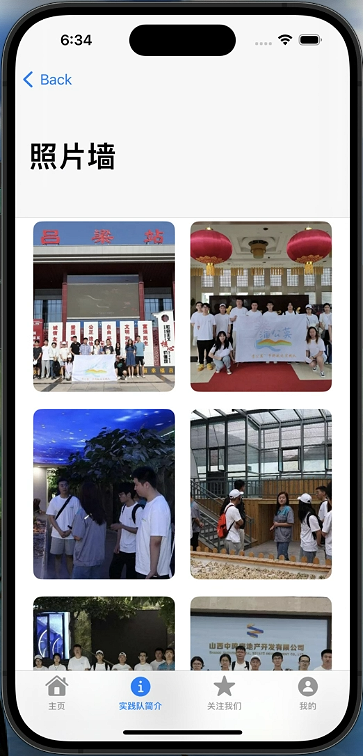
瀑布照片墙是我们实践期间的一些合照,支持点击放大观看效果。
1 2 3 4 5 6 7 8 9 10 11 12 13 14 15 16 17 18 19 20 21 22 23 24 25 26 27 28 29 30 31 32 33 34 35 36 37 38 39 40 41 42 43 44 45 46 47 48 49 50 51 52 53 54 55 56 struct PhotoWallView : View { @State private var images = ["LvLiangTeam" ,"Wall1" ,"Wall2" ,"Wall3" , "Wall4" ,"Wall5" ,"Wall6" ,"Wall7" ,"Wall8" ,"Wall9" , "Wall10" ,"Wall11" ,"Wall12" ,"Wall13" ] @State private var selectedImage: String ? = nil var body: some View { NavigationView { GridView (images: images, selectedImage: $selectedImage ) .navigationTitle("照片墙" ) } } } struct GridView : View { let images: [String ] @Binding var selectedImage: String ? var body: some View { let gridWidth = (UIScreen .main.bounds.width - 60 ) / 2 NavigationView { ScrollView { LazyVGrid (columns: [GridItem (), GridItem ()], spacing: 20 ) { ForEach (images, id: \.self ) { imageName in NavigationLink (destination: ZoomImageView (imageName: imageName)){ Image (imageName) .resizable() .scaledToFill() .frame(width: gridWidth,height: 200 ) .clipped() .cornerRadius(10 ) } } } .padding() } } } } struct ZoomImageView : View { var imageName: String var body: some View { Image (imageName) .resizable() .scaledToFit() .navigationBarTitleDisplayMode(.inline) } }
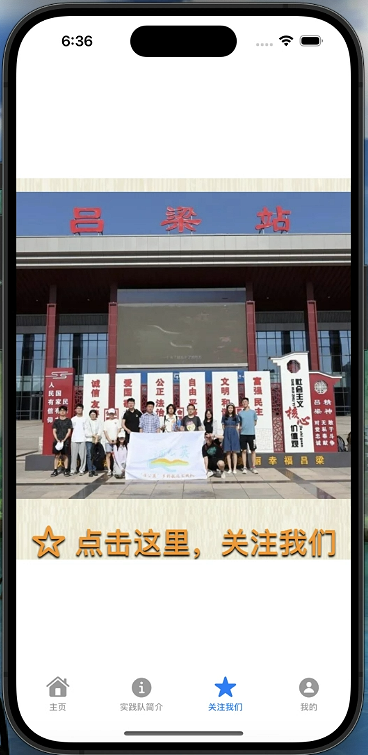
这里支持在点击"关注我们"时就会自动出现这个弹窗,而且也支持在点击黄字后出现该弹窗,通过扫描该微信二维码就可以实现关注的功能。
1
2
3
4
5
6
7
8
struct ImageViewer : View { var body: some View { Image ("ErWeiMa" ) .resizable() .scaledToFit() .padding() } }
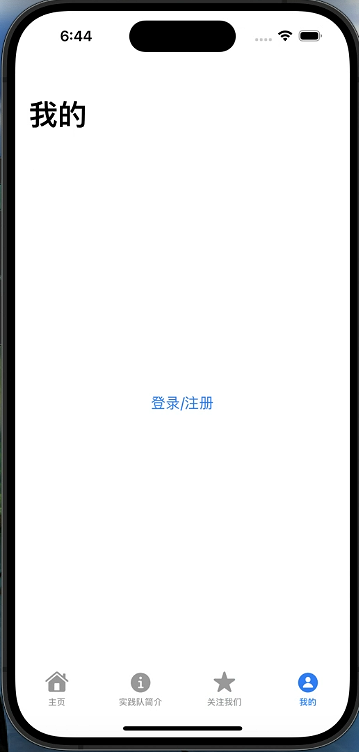
1 2 3 4 5 6 7 8 9 10 11 12 13 14 15 16 17 18 19 20 21 22 23 24 25 26 27 28 29 30 31 32 33 34 35 36 37 38 39 40 41 42 43 44 45 46 47 48 49 50 51 52 53 54 struct ProfileModalView : View { @EnvironmentObject var userData: UserData var body: some View { NavigationView { VStack { if userData.isLogged { VStack { Image (systemName: userData.avatar) .resizable() .frame(width: 100 , height: 100 ) Text ("用户名:\(userData.username) " ) Text ("个人描述:\(userData.description) " ) NavigationLink (destination: ProfileEditView (userData: userData)) { Text ("编辑个人资料" ) } .padding() NavigationLink (destination: FavoritesView ()) { Text ("我的收藏" ) } Button ("退出登录" ) { logout() } .padding() } } else { NavigationLink (destination: LoginView ()) { Text ("登录/注册" ) }.environmentObject(UserData ()) } } .padding() .navigationTitle("我的" ) } } private func logout (){ DataTable [userData.username] = User ( password: userData.password, description: userData.description, avatar: userData.avatar, favorites: userData.favorites, likedArticles: userData.likedArticles) userData.isLogged = false userData.username = "未登录" userData.password = "" userData.description = "这里是个人描述" userData.showAlert = true userData.avatar = "person.circle" userData.favorites = [] userData.likedArticles = [] } }
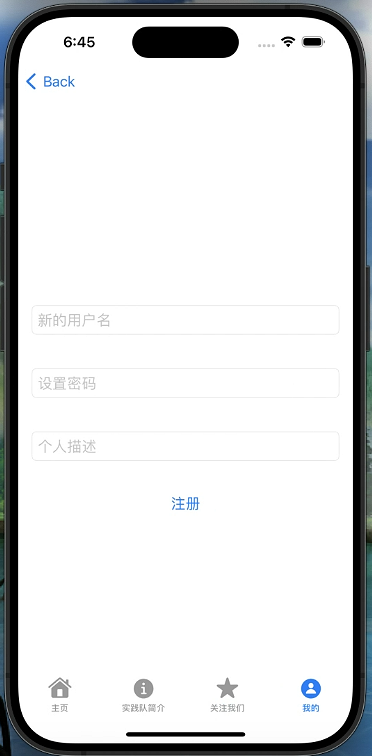
注册页面支持在密码为空时、用户名已经存在时支持相应性的报错。
1 2 3 4 5 6 7 8 9 10 11 12 13 14 15 16 17 18 19 20 21 22 23 24 25 26 27 28 29 30 31 32 33 34 35 36 37 38 39 40 41 42 43 44 45 46 47 48 49 50 51 52 53 struct RegisterView : View { @EnvironmentObject var userData: UserData @State private var inputUsername: String = "" @State private var inputPassword: String = "" @State private var inputDescription: String = "" var body: some View { VStack { TextField ("新的用户名" , text: $inputUsername ) .textFieldStyle(RoundedBorderTextFieldStyle ()) .padding() SecureField ("设置密码" , text: $inputPassword ) .textFieldStyle(RoundedBorderTextFieldStyle ()) .padding() TextField ("个人描述" , text: $inputDescription ) .textFieldStyle(RoundedBorderTextFieldStyle ()) .padding() Button ("注册" ) { if inputUsername == "" || inputPassword == "" || inputDescription == "" { userData.showAlert = true return } if DataTable [inputUsername] != nil { userData.showAlert = true return } userData.username = inputUsername userData.password = inputPassword userData.description = inputDescription userData.isLogged = true userData.showAlert = false DataTable [inputUsername] = User (isLogged: true , showAlert: false , username: inputUsername, password: inputPassword, description: inputDescription) } .alert(isPresented: $userData .showAlert) { if inputUsername == "" || inputPassword == "" || inputDescription == "" { Alert (title: Text ("密码为空" ), message: Text ("注册信息不能为空" ), dismissButton: .default(Text ("确定" ))) } else if DataTable [inputUsername] != nil { Alert (title: Text ("用户名已存在" ), message: Text ("请更换用户名" ), dismissButton: .default(Text ("确定" ))) }else { Alert (title: Text ("系统异常" ), message: Text ("请稍后再试" ), dismissButton: .default(Text ("确定" ))) } } .padding() } } }
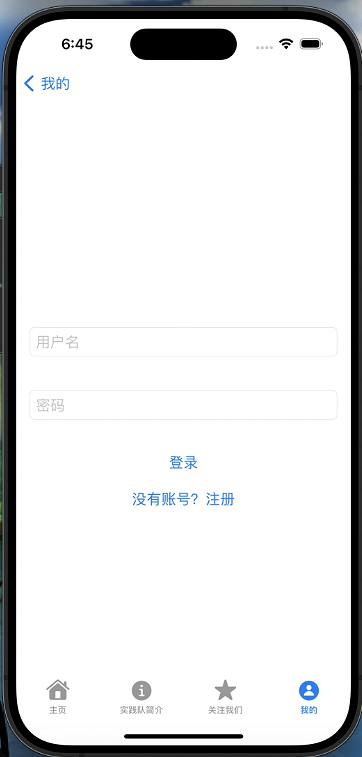
登录页面除了支持最基本的登录验证用户是否存在及密码是否正确以外,还有很多其他功能验证,比如在用户名为空或在密码为空时报错。
1 2 3 4 5 6 7 8 9 10 11 12 13 14 15 16 17 18 19 20 21 22 23 24 25 26 27 28 29 30 31 32 33 34 35 36 37 38 39 40 41 42 43 44 45 46 47 48 49 50 51 52 53 54 55 56 57 58 59 60 61 62 63 64 65 66 67 struct LoginView : View { @EnvironmentObject var userData: UserData @State private var inputUsername: String = "" @State private var inputPassword: String = "" @State private var rightPassword: String ? = nil @State private var Isright : Bool = false var body: some View { VStack { TextField ("用户名" , text: $inputUsername ) .textFieldStyle(RoundedBorderTextFieldStyle ()) .padding() SecureField ("密码" , text: $inputPassword ) .textFieldStyle(RoundedBorderTextFieldStyle ()) .padding() Button ("登录" ) { Isright = false if inputPassword == "" { userData.showAlert = true return } if let rightPassword = DataTable [inputUsername]? .password{ self .rightPassword = rightPassword if rightPassword == inputPassword{ userData.username = inputUsername userData.password = inputPassword userData.isLogged = true userData.showAlert = false userData.avatar = DataTable [inputUsername]? .avatar ?? "person.circle" userData.description = DataTable [inputUsername]? .description ?? "这里是个人描述" userData.favorites = DataTable [inputUsername]? .favorites ?? [] userData.likedArticles = DataTable [inputUsername]? .likedArticles ?? [] } else { userData.showAlert = true } }else { Isright = true userData.showAlert = true } } .padding() .alert(isPresented: $userData .showAlert) { if inputUsername == "" { Alert (title: Text ("用户名为空" ), message: Text ("用户名不能为空" ), dismissButton: .default(Text ("确定" ))) }else if inputPassword == "" { Alert (title: Text ("密码为空" ), message: Text ("请输入密码" ), dismissButton: .default(Text ("确定" ))) }else if Isright { Alert (title: Text ("用户名不存在" ), message: Text ("请检查用户名" ), dismissButton: .default(Text ("确定" ))) }else { Alert (title: Text ("密码错误" ), message: Text ("请检查密码" ), dismissButton: .default(Text ("确定" ))) } } NavigationLink ("没有账号?注册" , destination: RegisterView ()) } } }
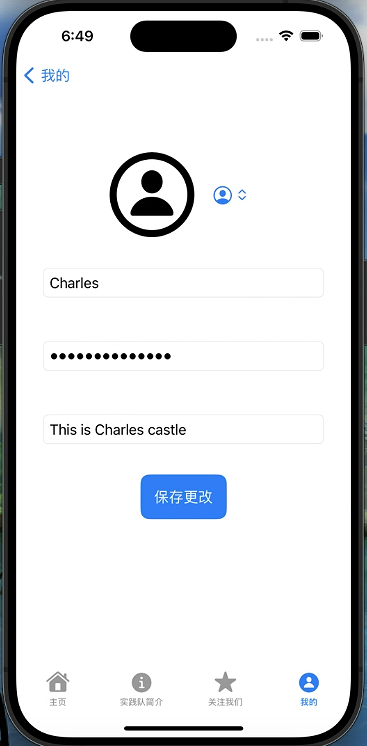
编辑个人信息板块支持更换头像功能,下拉列表可以选择头像。该板块支持将本身的信息填入输入框的功能,支持直接修改后保存更改。
1 2 3 4 5 6 7 8 9 10 11 12 13 14 15 16 17 18 19 20 21 22 23 24 25 26 27 28 29 30 31 32 33 34 35 36 37 38 39 40 41 42 43 44 45 46 47 48 49 50 51 52 53 54 55 56 57 58 59 60 61 62 63 64 65 66 67 68 69 70 71 72 73 74 75 76 77 78 79 80 81 82 struct ProfileEditView : View { @EnvironmentObject var userData: UserData @State private var editingUsername: String @State private var editingPassword: String @State private var editingDescription: String init (userData : UserData ) { _editingUsername = State (initialValue: userData.username) _editingPassword = State (initialValue: userData.password) _editingDescription = State (initialValue: userData.description) } var body: some View { VStack (spacing: 20 ) { HStack { Image (systemName: userData.avatar) .resizable() .scaledToFit() .frame(width: 100 , height: 100 ) .clipShape(Circle ()) .onTapGesture { } AvatarSelector (selectedAvatar: $userData .avatar) } TextField ("用户名" , text: $editingUsername ) .textFieldStyle(RoundedBorderTextFieldStyle ()) .padding() SecureField ("密码" , text: $editingPassword ) .textFieldStyle(RoundedBorderTextFieldStyle ()) .padding() TextField ("个人描述" , text: $editingDescription ) .textFieldStyle(RoundedBorderTextFieldStyle ()) .padding() Button ("保存更改" ) { userData.username = editingUsername userData.password = editingPassword userData.description = editingDescription } .padding() .background(Color .blue) .foregroundColor(.white) .cornerRadius(10 ) Spacer () } .padding() } } struct AvatarSelector : View { @Binding var selectedAvatar: String let avatars: [Avatar ] = [ Avatar (id: 0 , systemName: "person.crop.circle" ), Avatar (id: 1 , systemName: "person.crop.circle.fill" ), Avatar (id: 2 , systemName: "person.2.circle" ), Avatar (id: 3 , systemName: "person.3.circle" ) ] var body: some View { Picker ("Select Avatar" , selection: $selectedAvatar ) { ForEach (avatars) { avatar in Image (systemName: avatar.systemName) .resizable() .scaledToFit() .frame(width: 50 , height: 50 ) .tag(avatar.systemName) } } .labelsHidden() .pickerStyle(MenuPickerStyle ()) } }
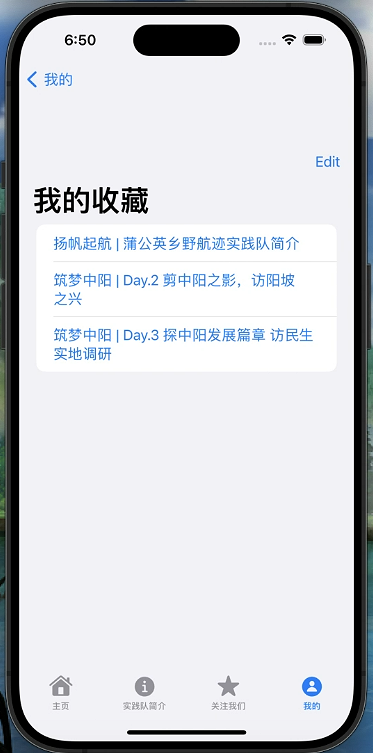
可以通过点击Edit删除自己的收藏夹中已经收藏过的文章,而点击这些文章可以跳转到相应的链接。
1 2 3 4 5 6 7 8 9 10 11 12 13 14 15 16 17 18 19 20 21 22 23 24 25 26 27 28 29 30 31 32 33 34 35 36 37 38 39 40 41 struct FavoritesView : View { @EnvironmentObject var userData: UserData var favorites: [WeChatArt ] { userData.favorites } var body: some View { NavigationView { List { ForEach (favorites, id: \.self ) { item in Button (action: { openURL(item.url) }) { Text (item.title) } } .onDelete(perform: removeItems) } .navigationTitle("我的收藏" ) .toolbar { EditButton () } } } private func openURL (_ url : URL ) { UIApplication .shared.open(url) } func removeItems (at offsets : IndexSet ) { userData.favorites.remove(atOffsets: offsets) } } struct FavoritesView_Previews : PreviewProvider { static var previews: some View { FavoritesView () } }
数据持久化是将应用程序的数据保存在本地存储中,以便在应用退出后或重新启动后仍然可以访问。由于考虑到本项目数据量不大,并且swift提供很好的关于解析 json 的协议Codable,所以未使用数据库,而是使用 json 进行初始数据的序列化与用户运行时数据的持久化存储。在Swift中,可以使用Decodable和Encodable协议来实现数据的编码和解码,通常将数据保存为JSON格式的文件。为了实现数据持久化,我们需要依靠协议Decodable和Encodable来实现json文件的编码和解码。以User为例可以如下编写:
1
2
3
4
5
6
7
8
9
10
11
12
13
14
15
16
17
18
19
20
21
22
23
24
25
26
27
28
29
30
31
32
33
34
35
36
37
38
39
class User : Codable { var isLogged: Bool var showAlert: Bool var username: String var password: String var description: String var avatar: String var favorites: [WeChatArt] var likedArticles: [String] func encode (to encoder: Encoder) throws { var container = encoder.container(keyedBy: CodingKeys.self) try container.encode(isLogged, forKey: .isLogged) try container.encode(showAlert, forKey: .showAlert) try container.encode(username, forKey: .username) try container.encode(password, forKey: .password) try container.encode(description, forKey: .description) try container.encode(avatar, forKey: .avatar) try container.encode(favorites, forKey: .favorites) try container.encode(likedArticles, forKey: .likedArticles) } enum CodingKeys : String, CodingKey { case isLogged case showAlert case username case password case description case avatar case favorites case likedArticles } }
之后我们只需要使用自己编写的load和store存取json文件就可以实现数据的持久化操作。
Decodable协议用于解析从外部数据源(例如JSON)加载的数据,将其转换为Swift对象。相反,Encodable协议用于将Swift对象编码为外部数据格式,例如JSON。这两个协议一起允许你在应用程序中轻松地将数据转换为可保存和加载的格式。
当需要保存数据时,使用JSONEncoder将Swift对象编码为JSON数据。当你需要加载数据时,使用JSONDecoder将JSON数据解码为Swift对象。这允许你在应用程序的不同运行会话之间保存和加载数据。
为了实现数据持久化还可以利用Sandbox沙箱,最终实现效果基本类似。
在beta版中,我们设计了地图展示功能,新添加的特色功能是提供了地图视角实现了对中阳地区的大致情况的展示,可以更好地让用户了解中阳所处的位置及地貌等信息。实现的代码如下:
1
2
3
4
5
6
7
8
9
10
11
12
13
14
15
16
17
18
import SwiftUIimport MapKitstruct MapView : View { @State private var region = MKCoordinateRegion ( center: CLLocationCoordinate2D (latitude: 37.3571 , longitude: 111.5812 ), span: MKCoordinateSpan (latitudeDelta: 0.5 , longitudeDelta: 0.5 ) ) var body: some View { NavigationView { Map (coordinateRegion: $region ) .navigationTitle("中阳县地图" ) .navigationBarTitleDisplayMode(.inline) .edgesIgnoringSafeArea(.all) } } }
为了实现上述的地图效果,我们需要使用IOS开发的第三方包——MapKit,利用这个包可以直接显示地图,其中coordinateRegion就是当前的地图区域(中心点,经纬度的跨度等等),可以实现非常好的效果。
由于对SwiftUI及mac环境不算非常了解,所以并未使用许多成熟的开源库。后续可以考虑对代码进行部分重构使结构更加清晰,进行功能和外观的进一步优化。
由于课设压力,本设计没有充分考虑产品适配的功能,后续如果有时间会对各种不同的机型模拟器进行测试。
后续功能建议:
增加文章评论功能(由于微信公众号文章本身带有这部分功能,所以没有设计)
由于实践队之后还会有其他活动,所以可以考虑设计管理员权限支持对文章、队员等动态增加的功能。
目前APP各页面切换还比较僵硬,使用的是默认样式,后续可以增加更多的动画代码使切换更加顺畅。
目前色彩搭配设计较为单调,且以黑白灰为主较为老气,后续可以继续优化UI设计。
由于之前没有使用过苹果,mac的购买时间也比较久了性能较差,Xcode编译器报错也是非常严格,所以开发swift过程还是比较麻烦的。在暑假时间自学了一部分UIkit的开发技术,当时就觉得swift开发非常困难,幸好之后从助教那里了解到了swiftUI,说是相比于UIkit更加简单易操作,可以实现和UIkit类似的效果,于是我将大作业转向学习swiftUI。
之后查找资料发现swiftUI因为版本更迭很快,查资料非常痛苦,相同的代码在不同版本的Xcode编译器经常报错,而且网上的资料还比较少,没有很系统的学习资料,所以我很多内容的学习只能依靠给定版本后靠GPT4来辅助学习。后来一边写大作业的时候,我尝试着从一些能跑通的源码里阅读理解,比如搞懂了@EnvironmentObject机制、@State、@Binding等等非常优雅非常高效的开发机制,让我感觉swiftUI确实非常适合敏捷开发,真的非常好用。
可能由于我并不是一个苹果系统的爱好者,之后开发IOS的机会应该也会少很多,但十分感谢这门课让我探索了这个有趣的新天地。


